


The crawling market has really expanded and changed over the years and it is now heavily leaning toward the scale scene. Back when 2.2 crawlers were the craze I set out to build a killer Axial AX10 with a CKRC chassis kit, Tekin electronics, Panther tires and several other modifications that resulted in a rock crawler I had plenty of fun with. But as my interests changed, the electronics were stripped from the rig and my project sat as a roller in my shop for years. It’s a shame it sat there for so long but recently I’ve had the itch to build a trail truck just for fun and saw an opportunity to breathe new life into that old AX10. The AX10 shares many critical components, such as the transmission and axles, with Axial’s popular SCX10 scale truck platform. What better way to build up a custom project than having the meat all right there to start it and the ability to tack on all the parts I want instead of swapping out stock parts from an already completed kit? Follow along as I build up an SCX10 truck for some fun driving while making the best use of what I have on hand and what I can find within my budget.
THE BUILD
The donor AX10 was outfitted with several modifications, including a new chassis, links and shocks. But as far as the parts on this truck that would transfer over to the project SCX10, the axles were stock and the tranny was outfitted with Robinson Racing gears.
Teardown started with the removal of the transmission from the center skid plate. Pretty easy stuff here, only three screws held the tranny in place on this particular kit setup. Pull the tranny with center drive axles up and out of the truck and set them aside for the SCX10 chassis later.
Up next on the removal list were the front and rear axles. The upper link plates that secured the upper link bar to the axles were removed and then the long screws that hold the lower links and shocks were taken off and the axles were ready to go to their new home, it was that simple.
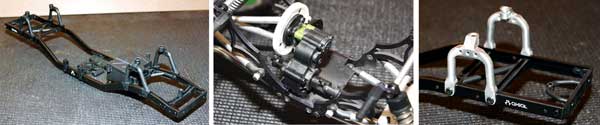
With all the major donor components set aside, I set off to gather up new and used parts for the build. The nice part about starting off with a parts truck is that you pick up the parts you want rather than battling with yourself about swapping out existing parts with option parts that will cost you. For the chassis set, I went with a brand new kit from Axial; part number AX30525. This chassis set gives you the frame rails, transmission mount, shock loops, receiver box and battery mount, along with a few other essential hardware pieces.
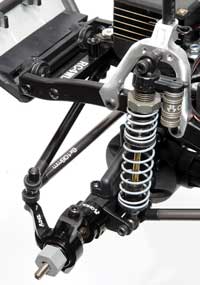
I am a hobby hoarder so when I was ready to dive into the build, I sifted through my collection of RC parts and pulled out a few aftermarket goodies. Some parts you see going on this truck will still be available and some will not. You might ask why I’m showing off some older parts on the build. One reason is that it’s my toy and I’ll build it how I want, but the second is that the scale truck scene is all about being creative and hunting down the parts you want to build your own unique machine. So with that said, I pulled out a full set of Vanquish machined aluminum front and rear shock hoops.
With the Vanquish shock hoop installation taking up a whole ten minutes of my time, I dug back into my box of parts and found an RC4WD chassis mount steering servo relocation kit. This particular kit is no longer listed on RC4WD’s website but there are several other companies that make chassis mount steering servo kits if you want to pull the servo off the axle. After taking a few minutes to install these well-machined pieces of aluminum I was ready to bolt in a high-torque Futaba servo.
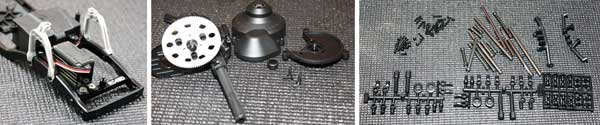
Now that the chassis had undergone some prep work I went back to installing the transmission. As I mentioned, I opted not to install a slipper but I did go for Axial’s gear cover assembly. This kit comes with the front cover, back cover and hardware. The new backplate replaces the cool, green anodized hardware; more parts for storage.
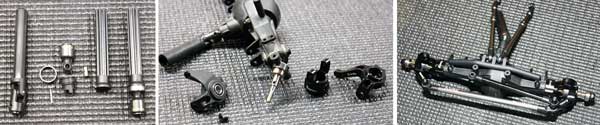
Just four screws bolted the transmission to the center SCX10 chassis skid plate and I moved on to replacing the center drive axles. There are several alternatives for swapping out the old shafts that can twist or snap under load. I opted for Axial’s WB8 driveshaft set that features multi-spline shafts with steel universal joints and captured pins. These will handle the abuse I’ll put the truck through with its upgraded power system.
Back to building; remember how I said that with a project like this you can build it up as you want? When it was time to install the suspension links, I again had a decision to make. Since I was building the truck from scratch I had the opportunity to go right with the preferred Axial aluminum link kit that provides all the links necessary to set up the truck suspension as a three or four-link system. I went with four and followed the instructions to build each suspension link.
Before I jumped in to installing the axles, I used the opportunity to change out the stock axle steering knuckle and carrier for some Axial aluminum units that I got a good deal on a while ago. Always try to build up your RC friend network; you never know what good deals you may come across. The aluminum units bolt on without issue, just remember to use thread lock compound on the king-pin screws. My front axle set already had universal driveshafts installed from a previous project. If you are building a truck from scratch, these are highly recommended parts.
Everything was coming together nicely with no part fitment issues so I assembled the front axle with the links and the new steering link. Again, everything bolted up easily but did require some hunting for hardware.
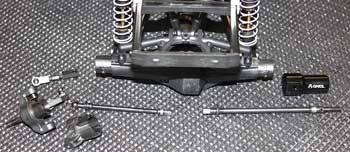
Then it was time to rework the rear axle. The early AX10’s, like the one I used as the donor for this project, used steering knuckles to support the rear wheel axle and a short turnbuckle link secured the knuckle in a fixed position. Although it works fine, there are a lot of unnecessary parts and considering it’s not too scale-looking, I opted to swap out the parts with Axial’s newer axle tube setup. I opted for the optional aluminum axle tubes and found some used long axle shafts from a friend to complete the rear axle upgrade. At the end of each axle shaft, I used wide Traxxas hexes to bolt the wheels to. This will increase the width of the truck.
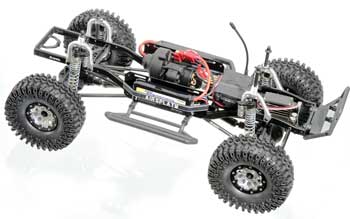
With the axles finished up and the links attached, the project was changing gears. It was time to bolt this rig together to start looking like a truck. I attached the links and shocks to the axles and bolted them up to the chassis. While doing so, I recalled seeing a truck at one point that had a battery plate on each side of the frame to hold two batteries on the truck. I liked the way it looked and replicated it on my project. I simply drilled holes in the plates to match up with the holes on the sides of the frame for the links and tranny, using longer screws to bolt everything in place. Velcro and rubber wrist bands would now secure the battery in place.
The truck was starting to take shape. I installed a new Tekin FXR ESC and 35T HD motor in the truck and powered it with two 2000mAh batteries, one on each plate, wired in parallel for 4000mAh of capacity to power the truck. I use a Futaba 4PL radio system for my other crawler and trail rigs, so this project took up another memory slot in the transmitter.
Next, we move on to body, wheels and tires. Vanquish offers lots of killer bead-lock type wheels, but I picked up the set you see on my truck a few years back for a steal. On this project, I went with some RC4WD Super Swamper tires. Again, you don’t always need the latest and greatest, you can simply get what you can afford or what you like.
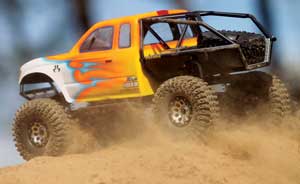
Finally we get to the body; I know, I know, it’s not a crazy scale painted body. But I love the paint scheme I use on my racing equipment, so there’s no reason I can’t use it on my trail rig. Larry G., from Kustom RC Graphics, hooked me up with the killer Faskolor work.
OUT TO PLAY
The cool part about a trail rig is you can really take it anywhere to run. From the parking lot outside my office to the park across the street, my play options were limitless. To run the rig, I took off for lunch early, grabbed a sandwich and headed to a park for some fun and food. Just as I set it down on the ground, I whipped out my iPhone 5 for a final picture of the clean truck, knowing it will probably never look like this again.
Some play time in the dirt instantly covered the truck in a thin layer of grime and at the same time the dirt spraying off the aggressive RC4WD treads which looked pretty cool. On the flats, the project truck did fine, but when I tried to climb piles of loose dirt, the truck just dug in and bottomed out on the chassis, requiring me to back out and off the hill. During my runs, I kept it in the back of my mind not to have any HOG (Hand of God) encounters as this isn’t the scale way to run your truck. Granted, my truck didn’t have a winch to right any roll overs, so there was a slight exception to my rule, but any time the truck got stuck, I had to try everything possible to get it on the road again without help.
The truck had decent speed with the 35T Tekin motor and 87-tooth Robinson gear but the pinion did need to go up a few teeth and after a gear change on the tailgate of my Chevrolet Blazer, I was happier with the overall speed. Next up, I tried climbing over some rocks and fallen trees. The SCX10 was a lot of fun and I maneuvered through some pretty awkward obstacles. The truck fared much better on surfaces with grip; any loose dirt on hills would result in the truck either struggling to climb or just digging in. It held its ground better downhill with the FX speed control holding a good consistent brake on the decent.
The other area I had to address on the truck was the steering. With the chassis mounted servo setup, the throw was not equal to both sides. This was due to the pivot angle of the steering arm. I did use a few spacers and a longer screw on the servo horn to drop the steering link down to improve the throw to an acceptable range for my use of the truck. My project was a lot of fun trekking through the park and even back at the office on the rock retaining walls around the building. Reviving an old rig, collecting parts and hunting down deals in order to build this project was worth the time and work I put into it.
THE LAST WORD
When the Axial AX10’s were first released, I can recall spending countless hours on the rocks but over time and with shift in the crawler world, my once fun truck was shelved. Now, the idea to take the dust covered rig and turn it into a trail-type truck has motivated me to revive many of the parts on that old rig. The purpose of this article is to simply open your mind to what is possible if you have an AX10 and want to bring it back to life. More importantly, the article’s intention is to show you how to be thrifty, to find the exact parts you want to use on your truck and to use sources like friends and online classifieds and auctions to get the parts. The most important thing is to build the truck as you want it built. My build may not be the hot setup for trail trucks today, but I like the way it looks and performs and when your custom project is done, remember, it was built by you for you.
PARTS LIST
AXIAL
• Aluminum 61-90mm Shock Set- AX30090
• Steel Straight Axle 6×104.5mm- AX30421
• Universal Set AX10- AX30464
• Radio Plate- AX30483
• Aluminum Rear Axle Lockout- AX30494
• Aluminum C Hub Carrier Black- AX30495
• Aluminum Knuckle Black- AX30496
• Frame Set SCX10- AX30525
• Wheelbase Links Set- AX30550
• WB8 Driveshaft Set- AX30794
• 1/10 Rock Rails Set- AX80041
• Trail Honcho Clear Body w/Rear Cage- AX4025
• Spur Gear Cover- AX80078
DURATRAX
• Onyx LiPo 2S 7.4V 2000mAh 25C Soft Case- DTXC1836
FUTABA
• S9350 1/8 Scale Digital High-Torque- S9350
• 4PLS 4-Channel 2.4GHz S-FHSS- FUTK1410
ROBINSON RACING
• Super Spur Gear 48P 87T- 1587
• Outdrive Diff Lock Gear- 1542
• Idler Gear Hard Steel- 1541
TEKIN
• FXR ESC/35T Crawler Motor Combo- TT2109 TRAXXAS
• Wheel Hex- 3654
VANQUISH PRODUCTS
• Axial SCX10 shock hoops, honch-shock-hoo10
Links
Axial Racing, axialracing.com, 949.600.8642
Duratrax, duratrax.com, 800.682.8948
Futaba, futaba-rc.com, 800.682.8948
Kustom RC Graphics, kustomrcgraphics.net
RC4WD, rc4wd.com
Robinson Racing Products, robinsonracingproducts.com, 559.692.2465
Tekin, teamtekin.com, 208.634.5559
Traxxas, traxxas.com, 972.265.8000
Vanquish Products, vanquishproducts.com, 916.334.4899
W.S. Deans, wsdeans.com, 714.828.6494


