 RC Driver The Best In RC Car & Truck News, Reviews & Video


Big Buck Builds with Big Attitude!
Words: Greg Vogel
Photos: Walter Sidas
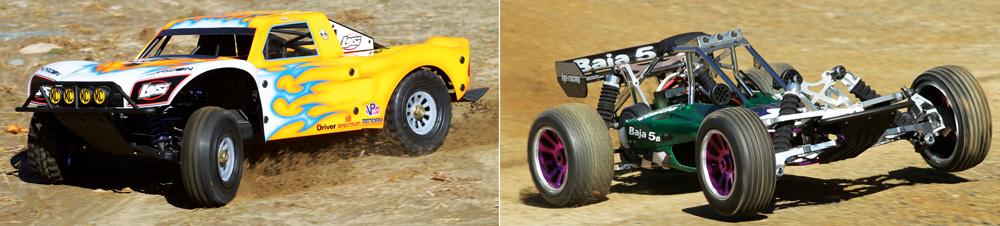
It never fails, once someone sees a huge 1/5-scale machine hit the dirt, people flock to watch it and the “want factor” of onlookers grows to immeasurable proportions. Well, we’re here to taunt you with two killer builds, one based on the Losi 5IVE-T and the other on the HPI Baja 5B. The 5IVE-T will take on a full factory option makeover while the 5B will get revamped in aluminum along with a power system swap. The two projects will showcase a load of parts to help you decide what parts are right to get for your machines. Or, if money is no object, perhaps you’ll be inspired to build some killer projects of your own.
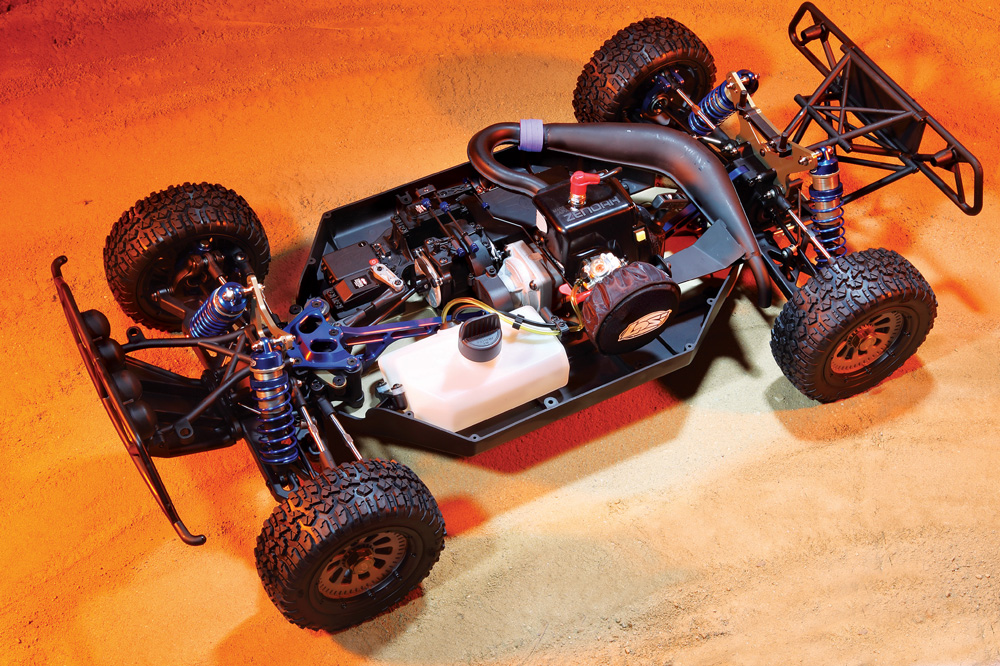
Losi 5IVE-T Full Factory Option Build

Since its release, the Losi 5IVE-T has built a huge following of large scale enthusiasts and has become a new addition to many 1/5-scale racers’ stables. Like many, I instantly had to have one and soon after that Losi started taunting me with option part releases. At first it was some aluminum braces, then titanium tierods, then shock bodies and the list grew. There are a bunch of items that improve performance and durability and I just had to try them out on my truck along with a few other modifications. The large scale scene is getting very competitive and you have to be at the top of your game wheeling one of these machines, so the more advantages I can get the better.
SUSPENSION
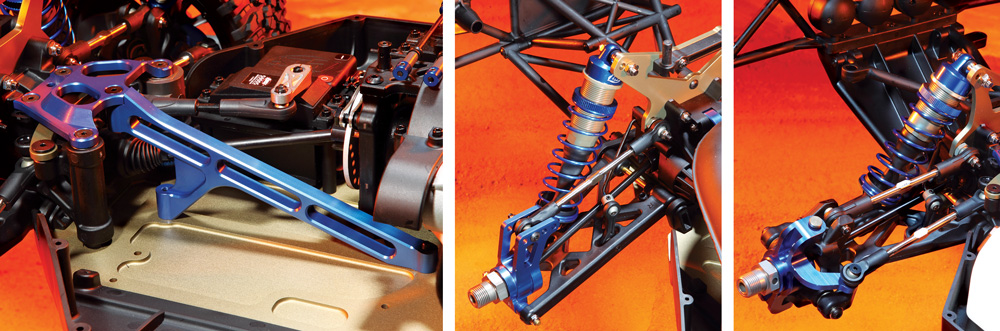
Although the truck is a Bind-N-Drive, I basically tore it down to near kit conditions just to install all of the option parts Losi offers. The first modification up was to replace all of the stock hinge pins with Ti-nitride coated hinge pins, including the outer rear screw pins, for smoother operation. Next I moved to swapping out all of the stock turnbuckles for strong lightweight titanium turnbuckles. It was a long and tedious job to unscrew all of the ball-ends, but using the optional Losi turnbuckle wrench (item no. LOSB4612) made things a little easier. The stock steering knuckles are very strong and although I’ve never broken one, I opted to install Losi’s blue anodized machined aluminum knuckles. These come with rubber shielded bearings pressed in and fit without any modifications. In the rear, I swapped plastic for aluminum, too. The rear hubs also come with bearing and blue anodized spacers to adjust hub spacing on the hinge pin and alter the wheelbase.
Now for the shocks: I don’t have any complaints with how my shocks operate, but knowing how much run time this truck is going to get, I decided to swap out the bodies for Losi’s hard anodized units. These shocks will feel smoother and more consistent as I add more laps to the chassis. While working on the shocks, I also used Ti-nitride coated shafts for smooth action and longevity. The shocks were filled with 30wt oil and installed with Losi’s titanium upper shock posts.
CHASSIS AND STEERING
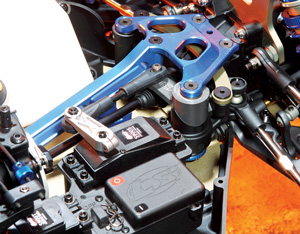
Starting with the steering, the first mod I actually completed on the truck was to install the aluminum servo saver arm. This is the first upgrade to all of my TLR 8IGHT 2.0 machines and certainly a worthy part to purchase for this truck. There’s a lot of strain on the part and I don’t want it to take me out of a race if it breaks.
Above the steering rack, the upper front brace plate was swapped out with Losi’s blue anodized machined aluminum plate and to brace it, I also installed the optional aluminum front brace. To match the front brace, I bolted down the blue anodized rear brace as well. On the 8IGHTS, the plastic brace is often preferred as it gives the rear chassis a little flex to gain traction, but here I’m going for better durability.
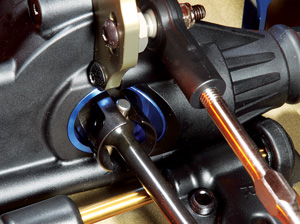
DRIVETRAIN
The driveline on the 5IVE-T is heavy-duty and it needs to be for the drivers pushing these trucks to the limits, but my truck will only see a race track, so that means it’s getting a lightweight make-over. Losi offers lightweight outdrives for the front/rear and center differentials. These pieces require a lot of work to install as you have to disassemble the diff housings and the diff cases, but they do drop several grams off each diff. While the rear differential was out, I replaced the stock cast bearing supports with Losi’s machined aluminum supports which fit the bearing much snugger than the stockers. Next Losi offers lightweight aluminum axles and pinion couplers for the driveshafts to mate to; they are significantly lighter than the stock steel units. They will wear more quickly than steel, but additional holes in them let you move the driveshaft pin to a new set of holes if the old holes are too elongated. The last of the option parts for the drivetrain in Losi’s current option arsenal are clutchbell gears with separate motor mount inserts that correspond with the gear size so the motor can be positioned properly for the perfect gear mesh. Currently I’m running the stock gearing, but have the optional gears on hand to tune the truck for any track conditions.
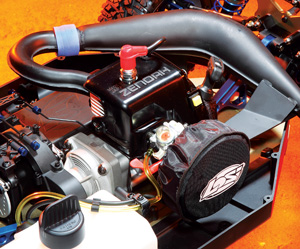
POWERPLANT
The 5IVE-T is equipped with a 26cc CY engine that is great to get you going, but the stock muffler restricts the excitement this engine has to offer. Losi’s optional tuned exhaust pipe comes with all the hardware necessary to bolt it on and really wakes up the engine while creating an exhaust tone that will turn heads wherever you run your truck. The pipe is a must-have item, but I couldn’t stop there. Horizon Hobby stocks a Zenoah 29cc and it went from my wish list and into my cart for this project. Now although the CY engine looks similar to the Zenoah, there are some differences that don’t allow it to just drop in. You’ll need to swap the fan shroud and front clutch housing from your CY engine to the Zenoah as the mounting bosses are positioned slightly different. You’ll also want to swap carburetors because the choke on the Zenoah engine is in the filter housing and not in the carb. Once the parts were swapped out, I fitted the pull starter and filter assembly with Losi’s dust covers.
BODY, WHEELS AND TIRES
The stock tires work extremely well, a fact that’s shocking to many due to their hard compound, but Losi offers the same Nomad tire in a soft compound which I mounted up on all four corners. These tires will work well on soft surfaces, but can expand more and make the truck feel loose. The wheels were bolted on using Losi’s capped wheel nuts that are also serrated so they dig into the wheel to help secure it. And now we get to the body. The two black and white themes Losi offers are great and there are many decal kits available to customize the stock body, but I wanted my body to fly my racing scheme, so I ordered up all of the clear body panels offered and sent them to Larry at Kustom RC Graphics where he laid down my race scheme perfectly as usual.
PERFORMANCE
Before just taking my new machine out to rip on it, I ran the truck slowly around my yard with the stock muffler on and VP/Powermaster premix fuel to break in the new Zenoah mill. With about a half an hour or so on the engine, I mounted up the Losi pipe and was ready to pay back the neighbors for riding their quads around their yard every Sunday morning. I fired up the powerplant and the crackle from the exhaust echoed around me. I ripped on the throttle and was met with a mean tone as the truck shot off and roosted grass in the air. This project was clearly ready for action.
I took it to the track and could instantly tell that the engine, pipe and upgrade drivetrain parts made a huge difference on the truck. Rather than watching the truck take off with a lumbering snap like with the stock gear, this truck took off with a ripping snap. The sound and power this combination puts out is amazing and I would say at a bare minimum, the pipe should be one of the firsts on your upgrade list. Top speed was also noticeable, better even than with the stock gearing. Overall I was impressed with the power side of my project. Next, would the handling be just as good?
The tires laid down plenty of traction and it wasn’t as loose as I expected with the softer tires on the loamy dirt. The truck locked in and accelerated hard, just as I would want for racing. The bulky truck, like in stock form, flew right over bumps and ruts without getting checked up and launching off of jumps was no problem. I even took the truck to a huge dirt jump and hit it at full throttle. It launched straight up into the air to the point where I was looking up at it—and I’m over six feet tall. The truck flattened out and dropped to the earth with a big thud on all four wheels. Cool! I did it over and over again and the Project 5IVE-T took an incredible beating. This truck is strong, fast and poised to win with all of the modifications done, plus it looks bad-ass and turns heads wherever I drive it; you can’t beat that!
PARTS LIST
LOSI
• F/R Inner Hinge Pins (2) Ti-Nitrided- LOSB2089
• Rear Outer Hinge Pins (2) Ti-Nitrided- LOSB2090
• Alum Front Spindle Set w/BB, Blue- LOSB2091
• Alum Rear Hub Set w/BB (2), Blue- LOSB2094
• Alum Bearing Inserts- LOSB2544
• Alum Servo Saver Arm- LOSB2549
• Alum Front Top Chassis Brace- LOSB2559
• Alum Front Chassis Brace- LOSB2560
• Alum Rear Chassis Brace- LOSB2561
• Upper Shock Mounts, Titanium- LOSB2860
• Front Shock Shaft Set (2) Ti-Nitrided- LOSB2861
• Rear Shock Shaft Set (2) Ti-Nitrided- LOSB2862
• Front Shock Body Set, Hard Anodized- LOSB2863
• Rear Shock Body Set, Hard Anodized- LOSB2864
• F/R Outdrive Set, Lightened- LOSB3213
• Center Outdrive Set, Lightened- LOSB3215
• Pinion Coupler Set, Aluminum Hard Anodized- LOSB3221
• Fr/R Stub Axles, Aluminum Hard Anodized- LOSB3223
• Wheel Nuts, Captured- LOSB3228
• Air Pre-Filter- LOSB5026
• Pull-Start Pre-Filter- LOSB5027
• Titanium Turnbuckle Set- LOSB5910
• Tuned Exhaust Pipe- LOSR8020
• Alum. Wheel Wrench- LOSB4611
• Alum Turnbuckle Wrench- LOSB4612
• Nomad Tire Set, Soft- LOSB7243
• Hood/Front Fenders Body Section- LOSB8101
• Cab Body Section- LOSB8102
• Body Left Fender & # Plate- LOSB8103
• Body Right Fender & # Plate- LOSB8104
ZENOAH
• 29cc Single Gas Engine with Clutch- ZENE29RC
SPEKTRUM
• DX3S 3-Channel DSM Surface Radio- SPM3140
KUSTOM RC GRAPHICS
• Custom paint work
HPI Baja 5B All-Aluminum E-Conversion
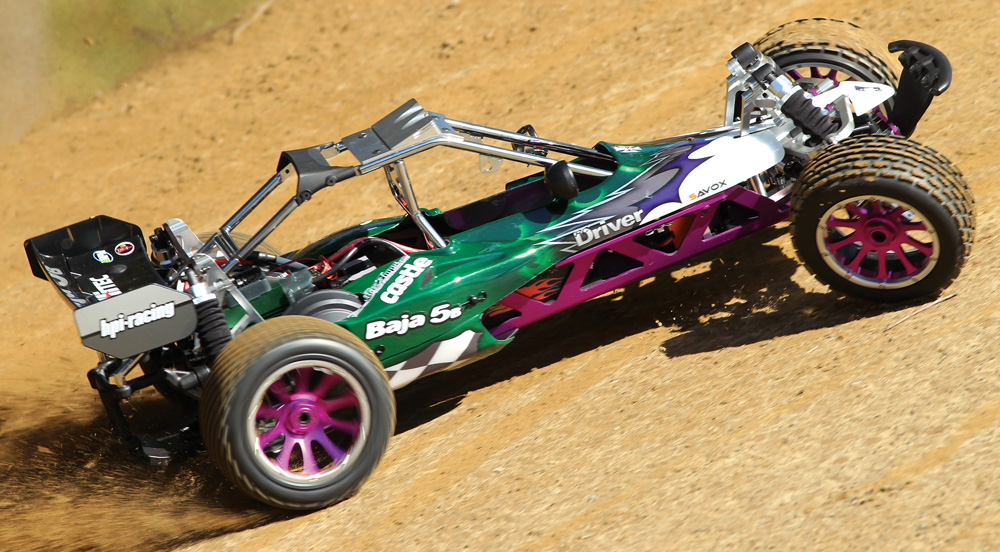
The HPI Baja is the 1/5 machine that helped fuel the surge in popularity in the large scale segment. HPI nailed the mission of making an ultra-cool off-roader that was easy to operate and delivered on the action. It didn’t take long for aftermarket manufacturers to start offering performance enhancing and bling parts to customize this machine with seemingly infinite options. Over the years RC Driver has delivered a number of Baja 5B’s in various modified versions, so for a new project we had to think of something a little different. This time we took a 5B and modded it with all aluminum, but instead of keeping the fuel fed powerplant, we swapped out the go power with a power system from E-experts Castle Creations. This machine is pretty wild! Let’s take a look at this inspirational build.
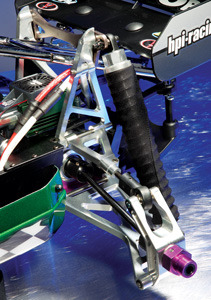
SUSPENSION
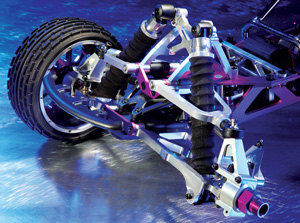
Before the build started, I checked out all the various option parts available and turned to GPM for their huge line of 5B parts offerings. I’ve used GPM parts with great success in the past and decided that the primary option parts I’d use here would be their machined aluminum goodies. Up front I started with GPM’s machined aluminum shock set. The shocks are much like the stock versions. Although GPM offers them in several colors, I stuck with silver. The units are prebuilt from the factory, already filled with oil and bled, so all I had to do was slip on GPM’s optional black dust covers and bolt them to the buggy. Next up I went with GPM’s upper and lower control arms. These too are machined in aluminum and have a bright finish with hard edges. The arms have nylon replaceable inserts for the stock steel hinge pins to pivot on so wear will be at a minimum. The upper ball ends are plastic and heavy-duty while the lower arm captures the ball in aluminum and has a screw to pinch the pivot ball. For wheel bearings, I installed Fullforce RC sealed bearings from their bearing kit line. As for stock goodies reused up front on the project, the HPI bulkhead, hinge pin plates and wheel hexes got a second life after I pulled them off a buggy from another project years ago.The front tower and tower braces are all GPM as well. I was pretty impressed that all the parts fit together well without any tweaking or grinding; the hinge pins slid easily in place.
In the rear, I also went with GPM upper and lower arms and rear tower supports. These parts also had a nice finish with hard edges. The shocks here, too, are GPM units with a double spring setup like the stock shocks, which I covered in GPM’s optional dust covers. For the rear hubs, I turned to Hostile Racing for their precision machined aluminum 4-degree rear hubs that will help the buggy corner better and improve traction.
DRIVELINE
Even with lots of e-power planned to transfer through the geartrain, I felt the stock internal transmission gears were up for the task; I did however install Fullforce RC bearings when building the tranny. The stock upper shaft however, was left out as I decided to install HPI’s Power Clutch System. Basically a heavy-duty slipper set-up, the Power Clutch will help put the power down from the Castle/ MaxAmps combo I’ll tell you about later. The Clutch comes with everything you need to install it, including a steel spur gear, gear cover and adjusting wrench. The dogbones and axles on the buggy are GPM steel units, which I lightly lubricated with Trakpower Krytech lubricant.
CHASSIS & STEERING
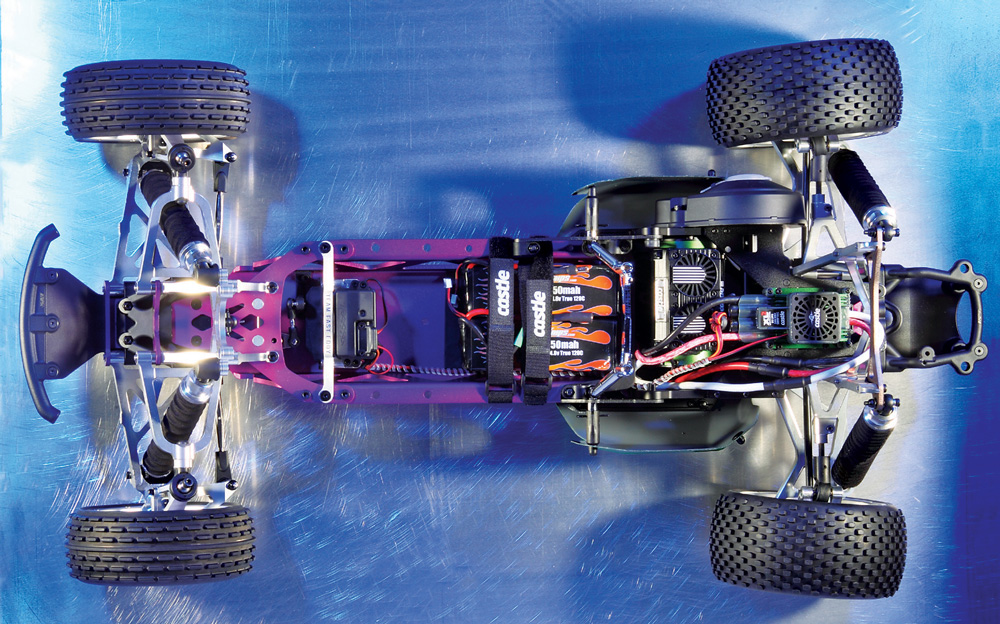
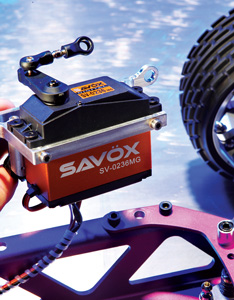
The chassis, like all of the purple aluminum parts on this buggy, was actually one that I removed from a new buggy years ago and was in a storage box in my house. Yes, I am an RC hoarder, I just can’t throw anything away. I thought the purple would look cool with the silver GPM parts and black anodized parts from the Castle conversion kit. But let’s start at the front; for the steering I went all aluminum here with GPM’s steering crank set which I fitted with ball bearings before sliding the cranks over the posts and into the GPM post mounts. To connect the cranks to the steering knuckles, I opted for GPM’s pre-assembled tie-rod set that features steel turnbuckles for improved durability. Moving back, I tossed the stock radio box and mounted the Savox steering servo to Team Fast Eddy’s aluminum servo mount with optional brackets that allow you to mount a small Traxxas radio box for the receiver. This setup really gives the buggy a clean look. And now we get to the stuff that is the heart of the conversion the Castle XL components. I picked up Castle Creations’ complete conversion kit. This comes with all of the plates and mounts necessary to take this machine from fuel power to electric. For the most part, the Castle conversion bolts in nicely until you get to the small forward upper side plates that key into the roll bar. It can be difficult to get some of the screws in, so I wound up loosening most of the screws pertaining to the conversion parts so I could get every screw started in every mount, then went back and tightened everything up later.
Then came some of the chassis’ finishing touches. First I installed RPM bumpers both front and rear to give the buggy a unique look while offering solid protection from tumbles and crashes. Next I Installed VG Racing’ chrome plated steel roll cage assembly. This cage is really cool. It has a hinge near the rear that allows you to easily swing up the front to access and maintain many of the buggy’s internal components. With the stock cage, you have to remove the rear shock tower assembly to get the cage out which can be time consuming. The VG cage also has extra mounting brackets for additional light pods; brilliant! On top of the VG cage, I installed GPM’s machined aluminum roof plate.
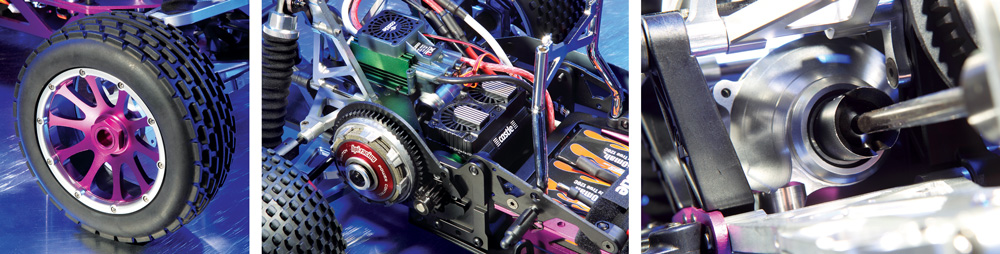
ELECTRONICS
If you haven’t noticed by now, I’ll hit you with it; this buggy is now equipped with Epower. I used the Castle Creations Mamba Xtreme conversion kit which includes all of the plates and hardware to install the included Mamba XL ESC, Neu Castle 2028 motor and fans. Castle even includes a pinion gear with the kit. Powering the Castle system are two MaxAmps.com 14.8V LiPo packs wired in series. Controlling the buggy is a Hitec SRX Pro 2.4GHz radio with a Savox SV-0236MG servo.
BODY, WHEELS AND TIRES
While researching GPM’s offerings I found they offered front and rear Baja tires. The front tread is a staggered rib and there are elongated pins on the rear. The compound is firm which should work well with the high RPM the Castle system puts out. The only downside to the tires is they don’t come with inserts so I picked up some HPI inserts. GPM offers Baja rims as well. The main hoop and beadlocks are plastic and the inner spokes are machined aluminum so in total it is a four-piece rim. The tires assemble easily as they fit perfectly into the rims’ bead. Then to finish things up, I sent a stock clear body to Larry at Kustom RC Graphics for some custom paint with Parma Faskolor paints.
PERFORMANCE
Things were about to get wild. I headed off to the local BMX track to test out my E-converted Baja and I was aiming to run at full throttle as much as I could. First up was roosting dirt. I grabbed a handful of throttle and I heard the Power Clutch whine and instantly I knew the Castle system was pumping out more power than I thought so I had to tighten the slipper. A few turns of the wrench and I ripped on the throttle again. This time the GPM tires dug in the ground and turned the hard packed dirt into powder and sent the debris flying through the air. This buggy is a monster! The acceleration is just insane with two 14.8V MaxAmps.com LiPo packs running in series to feed the Castle system. I tore up and down the straight sections of the track and used the big jumps as berms to roost dirt somewhere around eight feet in the air.
The buggy had plenty of power, but I wanted to check out its other abilities, so I started hitting some of the jumps. The buggy jumped pretty well and thanks to the extra torque I could get the buggy to sail level, unlike some of my gas Bajas that tend to kick up the rear. The project’s jumping ability was more than satisfactory and landings were typically plush thanks to the prebuilt GPM shocks absorbing harsh impacts.
My only complaint with my build was the mild steering characteristics. The Savox servo is a tad sluggish and that coupled with the buggy’s front-end push means turning radiuses are pretty wide. I wound up using brake to check up the rear on my runs which for play was just fine. I had an absolute blast launching the buggy off of huge jumps and didn’t fear any tumbles. I built this buggy to take hard hits and it came out of testing unscathed.
IN THE END
You’re kidding right? That’s what the guys in the RC Driver offices said when I set out to build two large scale project vehicles in a short time frame for this issue. I have to thank RC Driver’s building/repair assistant, Kyle Rohdes for helping me get these machines running. They both turned out to be awesome builds loaded with plenty of parts I have no problem recommending to other Losi 5IVE-T and HPI Baja owners. Both machines drive with a whole new attitude and have a new look that attracts a lot of attention. If these projects get your build urge in full gear, I suggest picking up a few parts here and there when you can, try out and enjoy each of your purchases before you tack on a new part. The fun of projects is the purchase, the build and the run and ultimately to have fun with your toy the way you want to.
PARTS LIST
CASTLE CREATIONS
• Mamba Xtreme Conversion Kit Baja- 9201
TEAM GPM
• Front rims w/ beadlock –BJ1003F
• Front/rear black shock cover -BJSC0
• Alloy front gear box -BJ012
• Alloy front lower arm -BJ055
• Steel rear wheel shaft -SBJ039R
• Rubber rear radial tires -BJ887R
• Alloy front upper arm -BJ054
• Alloy front shock tower -BJ028
• Alloy front tower support -BJ027
• Alloy front adjustable damper -BJ186F
• Alloy rear shock tower support -BJ030
• Steel rear dog bone -SBJ118R
• Alloy rear lower arm -BJ056
• Alloy roof scoop -BJ001
• Alloy rear upper arm -BJ057
• Rims frame w/a 10p beadlock -BJ1003R
• Rubber front radial tires skin -BJ893F
• Alloy front knuckle arm -BJ021
• Alloy steering assembly -BJ048
• 5×10 bearing for steering assembly-BJ048
FULLFORCE RC
• Baja 5B/5T/5SC Full Bearing Kit- 5B070
HITEC
• Aggressor SRX Pro System- 130241
HOSTILE RACING PRODUCTS
• Hostile 4 deg hub- Hub4-r 5B/5T
MAXAMPS.COM
• 14.8V 5450mAh LiPo Packs
RPM
• HPI Baja 5B front bumper & skid plate- 81972
• Rear Skid Plate- 81992
• Rear Bumper- 81982
TEAM FASTEDDY
• Battery Box Eliminator Baja- 1299-TFE
• Battery Box Eliminator RX Adapter- 1300-TFE
VG RACING
• Baja 5B Roll Cage- VGR-BajahingeBlk
LINKS
Fullforce RC fullforcerc.com
GPM hobbyetc.com, 603-595-8549
Hitec hitecrcd.com, 858-748-6948
Hostile Racing Products hostileracingproducts.com, 585-669-2045
HPI Racing hpiracing.com, 949-753-1099
Kustom RC Graphics kustomrcgraphics.net
Losi losi.com, 800-338-4639
MaxAmps maxamps.com, 888-654-4450
RPM rpmrcproducts.com, 909-393-0366
Savox hrpdealer.com, 800-622-7223
Spektrum spektrumrc.com, 800-338-4639
Team Fast Eddy teamfasteddy.com, 707-360-0190
VG Racing vgracing.com, 310-839-9700
VP/ Powermaster Fuels powermasterfuels.com, 210-635-7755
Zenoah, zenoah.com, 800-338-4639


