 RC Driver The Best In RC Car & Truck News, Reviews & Video


Add performance and durability to your truck

The Traxxas Slash is arguably one of the most popular radio control vehicles of all time. Being so popular, it has lent itself to countless hop-ups and upgrades with some being more flashy while others are more performance oriented. Since I typically go with the latter when selecting an aftermarket option, the M6 Driveshaft and Rear Hub set from Tekno R/C (P/N TKR1951X, $54.99) was right up my alley. This simple set serves three purposes; it increases durability, tunability and performance. Follow along as I go through the steps of installing this hot hop-up to a Slash.
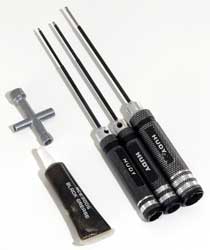
Tools/ Items Required
> 1.5, 2, 2.5mm Hex drivers
> Box wrench
> Grease
Step 1
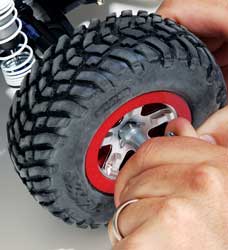
Before the M6 Driveshaft and Rear Hub set can be installed, the stock parts must be removed. This is not all that hard as should take all of 10-15 minutes. Start by removing the rear wheels.
Step 2
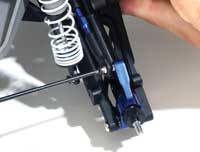
Then disconnect the rear hub from the turnbuckle.
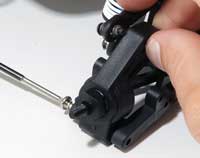
Step 3
Next, remove the outer hinge pin that connects the hub to the suspension arm. With the hub free, slide it apart from the male half of the slide shaft.
Step 4
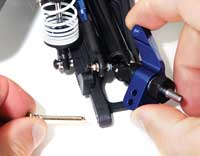
Once it the hub assembly is completely free, remove the hex wheel adapter, bearings and drive pin from the stock axle. You’ll only be reusing the pin and hex, so place the bearings and old hubs in a storage container in case you need them for use on another project later.
Step 5
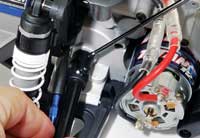
The last part that will need to be removed is the outdrive yolk from the transmission. Simply unscrew the drive pin from the yolk. Once it is almost completely backed out, you may need to pull it completely free using some needle-nose pliers. Once out, the yolk and male slide shaft should easily come free.
Step 6
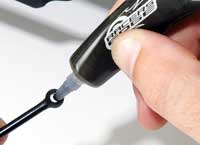
With all the stock bits removed, it is now time to add the M6 Driveshafts and Rear Hubs to the Slash. First up is the new differential outdrive. Just line it up and slide it onto the transmission. When you have it in place, put the locking pin back in. Some threadlock on the threads of the pin will ensure it stays put.
Step 7
Assembly of the CVDs is next. Start by applying some black grease to the opening at the end of the CV shaft.
Step 8
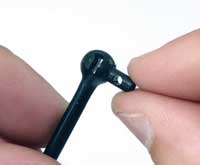
Then slide the coupling in place with the small hole aligned to the slot in the CV shaft.
Step 9
Slide the stub axle over the end of the CV shaft and then, if everything is aligned, push the long pin through the stub axle and CV shaft.
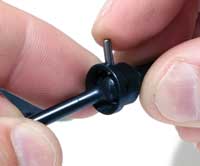
Step 10
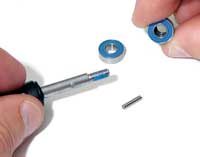
Next, push the newly supplied bearings into the new hub carrier. The larger, 10x15x4mm bearing goes on the inside while the smaller 6x10x4mm bearing fits in the outside.
Step 11

When the bearings are fully seated, slide the stub axle in through the bearings. Make sure the pin holding the axle to the CV shaft stays in place and does not fall out.
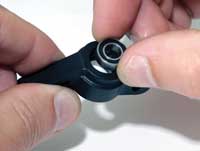
Step 12
Now, slide the axle pin into place and push on the new 12mm hex wheel adapter.
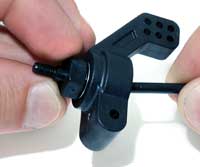
Step 13
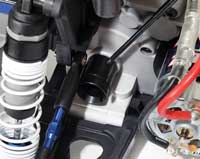
With the rear axle and CV shaft assembled and installed into the rear hub, it is time to attach the hub to the rest of the Slash. Just attach the hub to the rear A-arm using the stock hinge pin and reattach the rear turnbuckle while making sure the end of the CV shaft is aligned to the differential outdrive. Finally, reattach the rear wheel.
Done!
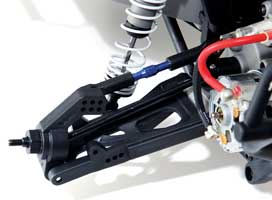
The M6 Driveshaft and Rear Hub set add a high level of adjustability and there are six locations to mount the rear turnbuckle to, to tune roll characteristics. The CVD driveshafts allow the rear suspension to operate more freely as they create much less friction than the stock telescoping driveshafts, and the use of the 10x15x4mm and 6x12x4 bearings helps the rear axle run straight and true with next-to-no wheel wobble. The larger bearing also captures the universal pin so you don’t have to worry about a universal joint failure. As soon as you hit the track with this installed, I am sure you will notice a huge improvement in performance; invoking the age old question, “Why didn’t I get these sooner?”
Words: Dean Berry
Links
Tekno RC, teknorc.com


