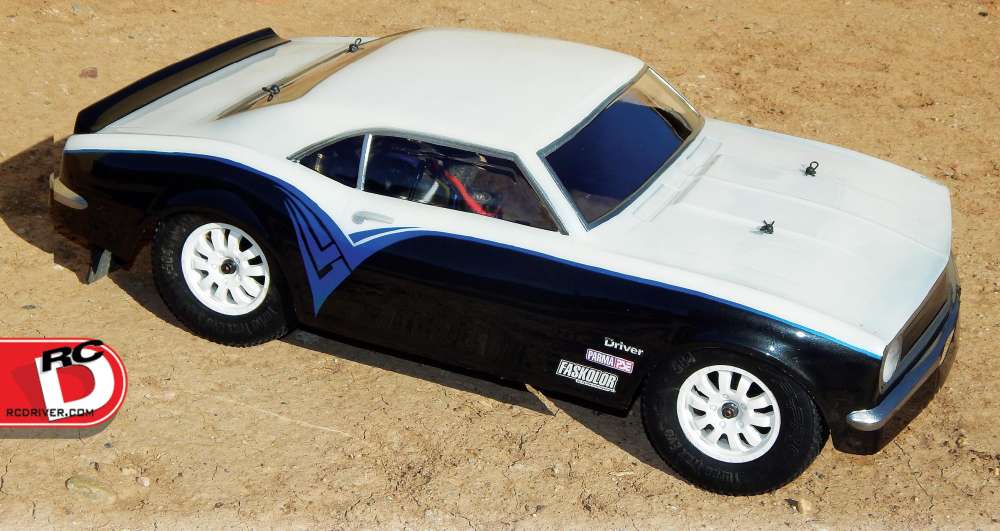
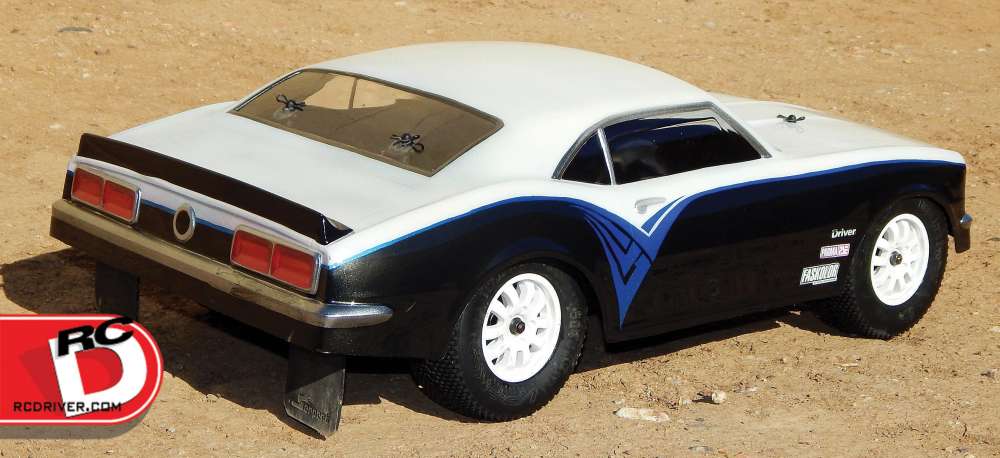
Parma has so many of these muscle car bodies for short course trucks for me to cover, that I’m kind of running low on unique ideas. I’ve done stock cars, a drag car, hot rods, etc. After pondering this one, I realized I’ve missed the most obvious idea. These bodies open up a whole new option for your off -road chassis. An on-road conversion! Companies such Pro- Line offer short course tires for the street. You could really take it all the way and limit your suspension travel, add some thicker shock oil, stiffer springs, taller gearing, and maybe throw a 3S brushless system in, and really build a street burner. To get a street custom look I thought it should be somewhat basic like just a two tone scheme, but I threw in a tribal graphic to spice it up, and then FasKolor Faschange paint really gives it a look that screams custom! Let’s see how it came out.
ITEMS USED Parma
• 68 Muscle Baja Body 1248
• FasMask 40282
• FasPearl Red 40058
• Faschange Blue 40181
• FasWhite 40000
• FasPearl Blue 40056
• FasKrome 40300
• FasPearl Charcoal 40054
• FasBlack 40001
1 To start off I trim the body on the molded-in body lines with a pair of Lexan scissors. There is a marking for a cutout for the front I left that in place. This body is designed to be a general fit for most short course bodies, so you will have to get it lined up and mark where you will make your holes for your body mounts. I line up the rear wheels in the wheel wells because the wheelbase changes at the front due the caster in the front end. The front bumper was barely pushing out the front end, so I just made a slot where it was hitting, rather than cut out the front end. Once everything was lined up, and I adjusted the height of the body mounts, I marked the tops of the post, and made my holes with a body reamer.
2 After getting the body trimmed out and test fitted, I scrubbed it out with a little dish soap and some water to remove any residual oils and shavings left over from mounting. I start masking by applying the liquid mask with a foam brush. I’ve tried airbrushing, foam roller, and bristle brushes to apply liquid mask, a cheap foam brush works best. I laid two thick coats, giving it a couple of hours between coats to dry, and then I left it overnight after the final coat.
3 I wanted to do something more than the basic two-tone to really give it that custom look. So I doodled up a tribal graphic with a pencil. What I did here was leave slight gaps to insinuate the lines overlapping, then I made the spacing between the lines similar, so it kind of plays with the eyes. After I had a graphic I liked, I traced it over with a marker so I would have a reverse image on the back side of the paper. I then trimmed it out and tacked it to the body with masking tape. I traced the image on the outside of the body, with the ultra fine tip of my detail marker. To make the line that separates the colors I used a piece of tape as a guideline. This allowed me to bend it to the curves of the body, while still keeping a straight line.
4 With my graphic all laid out, I start cutting my graphics in the liquid mask with a hobby knife. When I drew the graphic I purposely made one particular line that would separate the colors. I started by cutting that line, then the graphics below the line. I also had to cut out the bumpers, the bottom of the grill, taillights, and the emblem in the rear. I removed the mask from the background, leaving the graphics and details behind. I filled the area with FasPearl Charcoal. I used Charcoal rather than black to keep with the custom theme. I backed it with FasKrome to make it more opaque and add sparkle.
5 Next I removed the mask from the graphic area. I also cut out the bit of graphic above the line and cut the top part of the line that basically wraps around the body. After removing the mask from those areas, I filled them with a couple of light coats of FasPearl Blue. The pearl color also needs to be backed with FasKrome, but after the next step.
6 I then remove the mask from the bumpers. Next I cut out the grill, leaving the headlights, also the door handles, window trim, taillight trim and the rear emblem, and fill those areas with FasKrome, while also backing all the blue areas with the FasKrome at the same time.
7 Now I can remove the big chunk of mask from the top half of the body. I laid a couple of light coats of the FasChange Blue. Getting the right amount of this can be tricky. Too much and it will be a solid pearl blue, too little and you won’t really see it. The effect is more pronounced on darker colors such as black, and harder to see on white. Since I will be backing it with white, I think I could have gone a little heavier. After I backed with white, I removed the mask from the headlights and shaded along the bottom.
8 Almost done! Just filling the details now. I removed the mask from the taillights and filled them with FasPearl Red. I used the Pearl so they would catch the light. Then when I backed the red with FasKrome, I also filled in the rest of the headlights with the FasKrome.
9 To get a flat finish, I paint on the outside of he body and use the overspray film as a mask. I cut and removed the overspray film from the grill and spoiler, and then filled those areas with FasBlack. I also like to back the whole inside with black for a uniform look that that just looks so much better through the windows. All that I have left to do is remove the window mask, and the remaining overspray film. This is by far my favorite part!
WRAP UP
I typically avoid paint jobs with a lot of white. It just looks too vanilla to me, but the Faschange paints turn white into some- thing really spectacular. I wish photos really showed the effect, but it is something you almost have to catch in motion. I could have laid the Faschange a little thicker on the white. I typically spray it over black, because that is how you get the most pro- nounced effect. It works well over any opaque color, but gets lost in the pearl colors. The Faschange is available in different colors, so you can experiment with many color combinations. Try it!
 RC Driver The Best In RC Car & Truck News, Reviews & Video


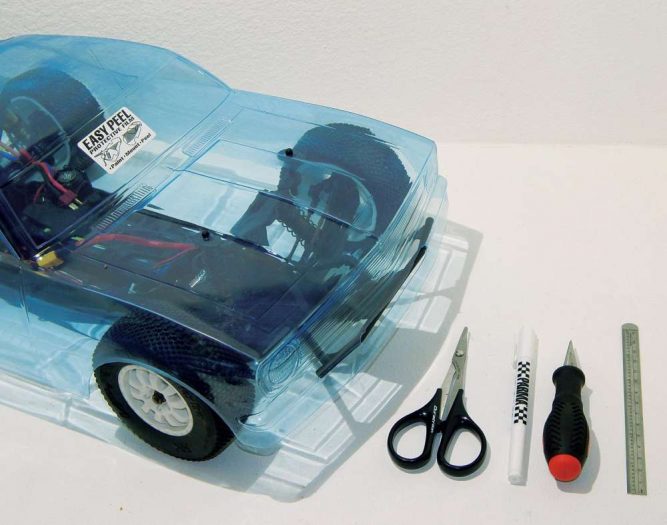 1 To start off I trim the body on the molded-in body lines with a pair of Lexan scissors. There is a marking for a cutout for the front I left that in place. This body is designed to be a general fit for most short course bodies, so you will have to get it lined up and mark where you will make your holes for your body mounts. I line up the rear wheels in the wheel wells because the wheelbase changes at the front due the caster in the front end. The front bumper was barely pushing out the front end, so I just made a slot where it was hitting, rather than cut out the front end. Once everything was lined up, and I adjusted the height of the body mounts, I marked the tops of the post, and made my holes with a body reamer.
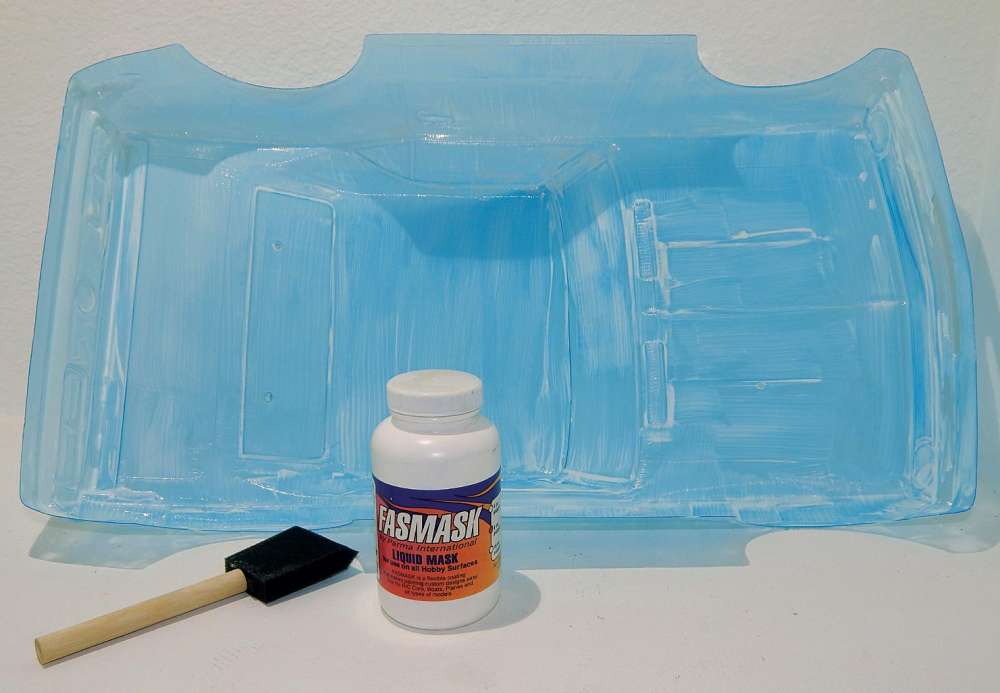 2 After getting the body trimmed out and test fitted, I scrubbed it out with a little dish soap and some water to remove any residual oils and shavings left over from mounting. I start masking by applying the liquid mask with a foam brush. I’ve tried airbrushing, foam roller, and bristle brushes to apply liquid mask, a cheap foam brush works best. I laid two thick coats, giving it a couple of hours between coats to dry, and then I left it overnight after the final coat.
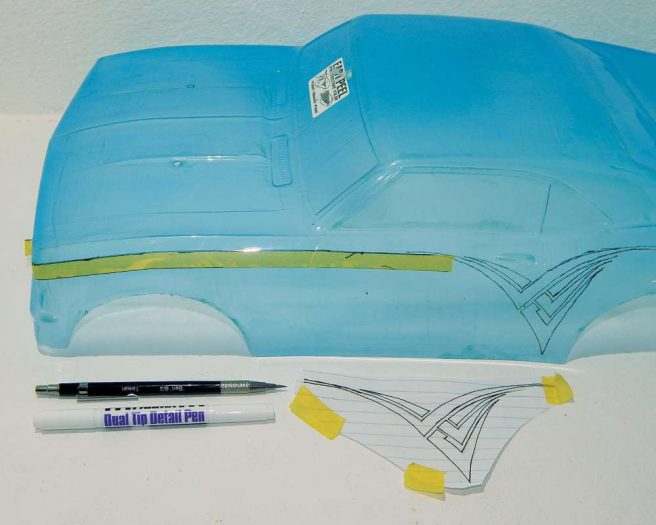 3 I wanted to do something more than the basic two-tone to really give it that custom look. So I doodled up a tribal graphic with a pencil. What I did here was leave slight gaps to insinuate the lines overlapping, then I made the spacing between the lines similar, so it kind of plays with the eyes. After I had a graphic I liked, I traced it over with a marker so I would have a reverse image on the back side of the paper. I then trimmed it out and tacked it to the body with masking tape. I traced the image on the outside of the body, with the ultra fine tip of my detail marker. To make the line that separates the colors I used a piece of tape as a guideline. This allowed me to bend it to the curves of the body, while still keeping a straight line.
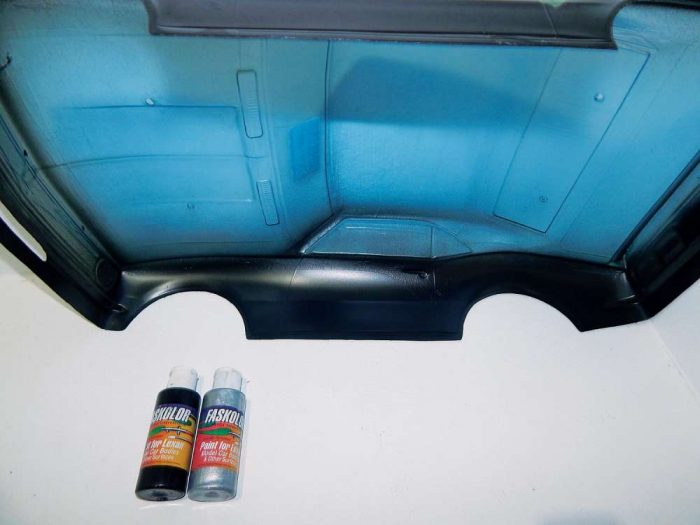 4 With my graphic all laid out, I start cutting my graphics in the liquid mask with a hobby knife. When I drew the graphic I purposely made one particular line that would separate the colors. I started by cutting that line, then the graphics below the line. I also had to cut out the bumpers, the bottom of the grill, taillights, and the emblem in the rear. I removed the mask from the background, leaving the graphics and details behind. I filled the area with FasPearl Charcoal. I used Charcoal rather than black to keep with the custom theme. I backed it with FasKrome to make it more opaque and add sparkle.
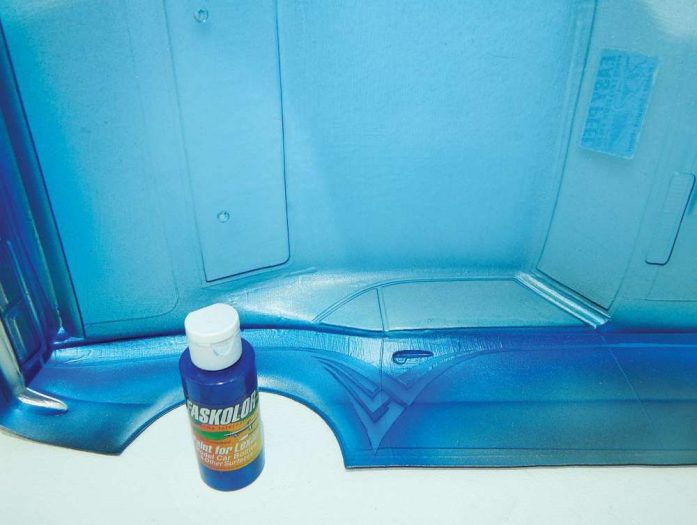 5 Next I removed the mask from the graphic area. I also cut out the bit of graphic above the line and cut the top part of the line that basically wraps around the body. After removing the mask from those areas, I filled them with a couple of light coats of FasPearl Blue. The pearl color also needs to be backed with FasKrome, but after the next step.
 6 I then remove the mask from the bumpers. Next I cut out the grill, leaving the headlights, also the door handles, window trim, taillight trim and the rear emblem, and fill those areas with FasKrome, while also backing all the blue areas with the FasKrome at the same time.
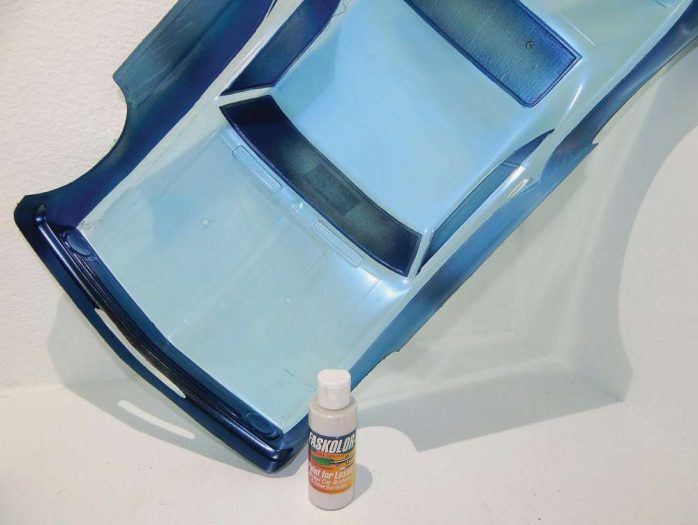 7 Now I can remove the big chunk of mask from the top half of the body. I laid a couple of light coats of the FasChange Blue. Getting the right amount of this can be tricky. Too much and it will be a solid pearl blue, too little and you won’t really see it. The effect is more pronounced on darker colors such as black, and harder to see on white. Since I will be backing it with white, I think I could have gone a little heavier. After I backed with white, I removed the mask from the headlights and shaded along the bottom.
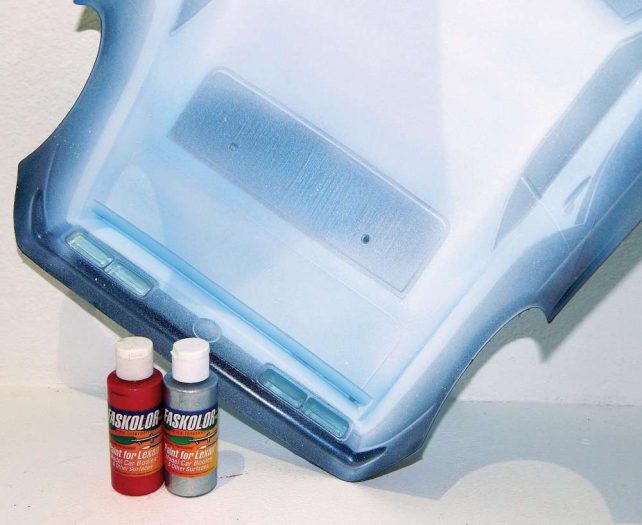 8 Almost done! Just filling the details now. I removed the mask from the taillights and filled them with FasPearl Red. I used the Pearl so they would catch the light. Then when I backed the red with FasKrome, I also filled in the rest of the headlights with the FasKrome.
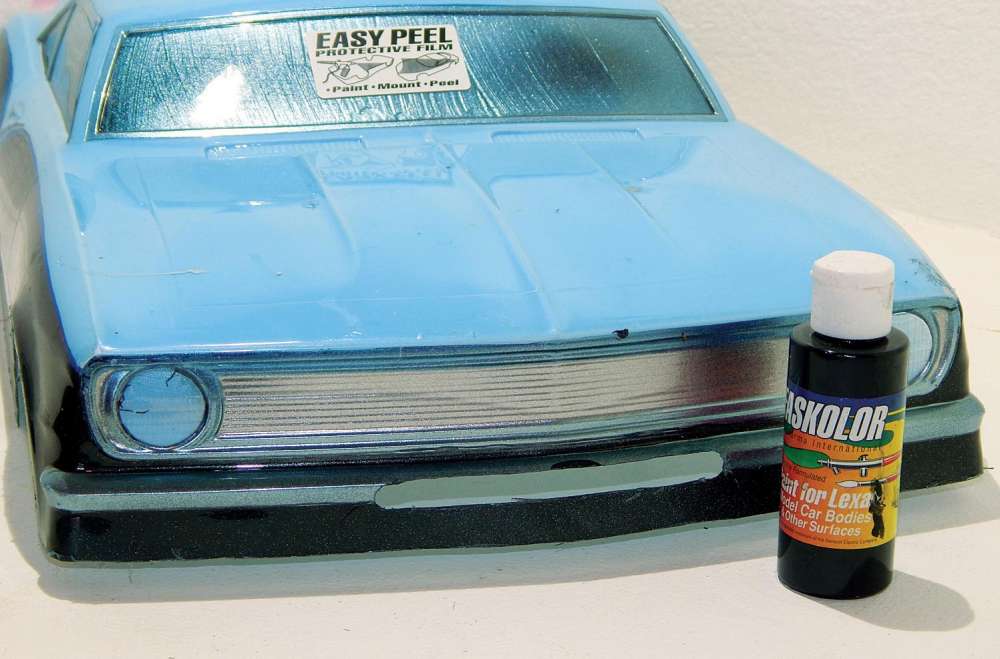 9 To get a flat finish, I paint on the outside of he body and use the overspray film as a mask. I cut and removed the overspray film from the grill and spoiler, and then filled those areas with FasBlack. I also like to back the whole inside with black for a uniform look that that just looks so much better through the windows. All that I have left to do is remove the window mask, and the remaining overspray film. This is by far my favorite part!


