This article was originally published in RC Driver’s April 2015 issue.
Words and Photos by David Harr
ITEMS USED
Parma
• 69 Muscle Baja body #1244 • Drag Decals #10626
• FasMask liquid mask #40281 • FasWhite #40000
• FasKrome #40300
• FasBlack #40001
• FasTint #40191
• Faspearl Blue#40055
• Faspearl Red #40056
• Faspearl Gold #40053
• Faspearl Orange #40302
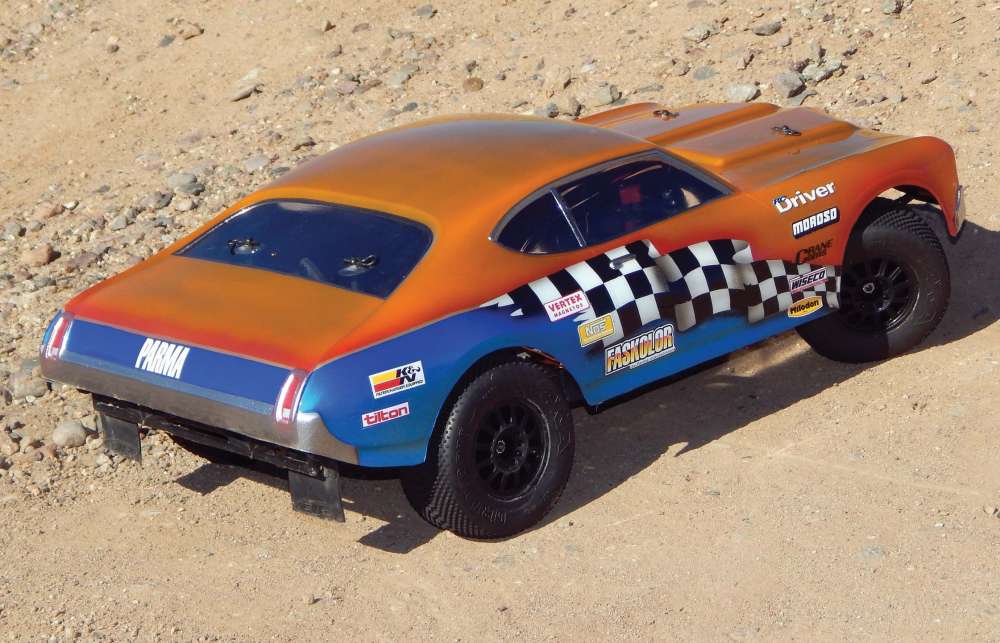
Here’s a tip for you. When you you’re picking your next RC, don’t let the body on it influence your decision. Why? Because bodies are wear and tear items that will be replaced and when you replace it, your new look can be anything you want. Parma’s line of short course bodies is ever expanding and they have you covered with everything from serious race bodies to a dune buggy, classic cars, classic trucks and now they have a selection of muscle car bodies. The first one that I’m going to paint is the 69 Muscle. I wanted to do something different on this one and I was on the phone with my friend Mike, milking him for ideas. He didn’t think he had anything to offer and just said, “Oh you know me, I just stick checkered flag decals on everything.” And it all clicked, checkered flags, they’re timeless, perfect for a muscle race car, could be a drag car, stock car, or even vintage Trans Am. It’s going to work! So this month we are painting a checkered flag on Parma’s latest muscle car body for short course. Here we go!
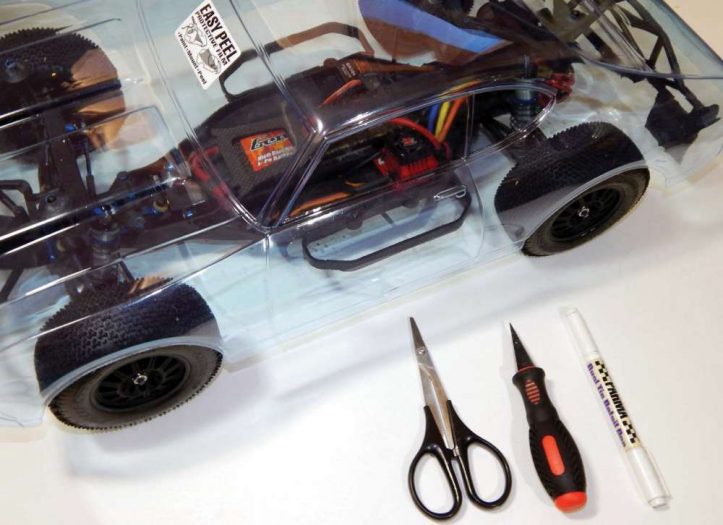
1 To mount this body up on my SC10, I first trimmed it out with my Lexan scissors. Then I sat it on the chassis and had notch the front around the bumper to bring it down. I could bring it down one more hole if I notched the front more, but I wanted to save as much of the bumper on the body as possible. So I raised the front body mounts as high as they would go and in the rear there was room to drill another hole in the post, to raise it up just a tad higher than the front. When I had it sitting right, I marked the tops of the body posts with a permanent marker and made my hole with a body reamer.
2 I feel Parma’s FasMask liquid mask is the easiest way to mask off a graphic. To lay it I just put a few big drops in the roof and hood and spread it out in even strokes with a foam brush. I do 2-3 coats depending on how thick I lay it and I allow and a couple hours to dry between coats. The final coat dries overnight
3 To draw a waving flag you just draw a line with some S-curves in there. On the back side of the top of the “S” make a line straight down. This will create the back side of the flag. Then on the front side of the bottom loop of the “S” draw a line straight down for the width of the flag. I like to put just a little curve in it for depth. Then, matching the curve of the bottom of your “S”, it curves back to create the bottom edge of the flag. To do the checkers I do two horizontal lines that match the curves of the edges. Then I do vertical lines that are not exactly straight, so it doesn’t look like a flat surface. The distance between the lines is determined by the width of the flag at that point, I just try to make squares. I trace the pattern onto the outside of the body with a permanent marker. I make “X”s in the checkers to chart my pattern so I don’t get confused later, which happens easier than you think with checkers. I used a piece of masking tape to create the straight line back where the colors will separate.
4 Before I cut the flag, I cut the lines for the door handles, then I carefully cut all the lines and remove every other square marked with the “X” and fill them in with FasBlack and then I remove the rest of the squares. Shading will not really show up on black, so I do all the shading in the white areas. Ideally, if you look at the flag there are three sections. You should do one section, back with white, and then do the next to really get a good 3-D effect, but I did it the timesaving way and did the whole flag at once. The main idea is to get soft wide shading on the forward part of the flag then get in tight for a drop shadow effect on the parts farther back. I also shaded around the edges. I used Fastint so the shading would not blend with the black. After the front of the flag was painted, I pulled off the little triangles that make the back side and just shaded a little on the bottom edge before backing with the FasWhite.
5 Next I cut the line back where the colors will separate and also cut the trim around the taillights. Then I removed the entire mask below the flag. Since I will be backing it with a darker color, I used FasBlack to do the drop shadow. Then I filled the area with a couple of coats of FasPearl Blue. The pearl colors need to be backed with FasKrome to make them more opaque.
6 This is a quick step; I just cut another line just above the blue. Remove the thin line of mask and fill with Faspearl Gold and back with FasKrome. This creates a trim line for separation of colors.
7 Before doing the background color, I cut out the front grill and all the window trim and then removed all of the mask from the background. To give the paint job a little depth, I shaded around all the bottom edges with Faspearl Red. Then I backed the whole thing up with a couple of good coats of Faspearl Orange.
8 Before backing the orange with FasKrome, I cut the centers of the headlights and taillights and removed the grill, taillight trim, window trim, door handles and I forgot, but there are hood latches that would look good in FasKrome. Then I backed the orange and filled all the trim areas with FasKrome at the same time.
9 I wanted the holes in the grill and hood scoop to have a flatter texture, so I cut the overspray film on the outside in these areas and filled them with FasBlack. It occurred to me that race cars often have the headlights blacked out, so I removed the mask from the headlights before I covered the whole inside of the body with black to block light coming through.
10 I had this drag decal set from Parma that seemed like they would be perfect for a muscle body. I picked these up for another project but there were plenty left over for this body. I just cut them out with my Lexan scissor and applied. I lined up one corner, holding down with my thumbnail and then when it was straight, I pushed it down.
WRAP UP
Well, Mike didn’t think he had anything to offer but he gave me the perfect inspiration. I think it came out great. While I know there is a 9.5 brushless motor under there, when I look at it I can’t help but think loud, rumbly, big block, V-8 muscle! Parma has released three of these muscle car bodies and based on how well this one turned out; you can expect to see the others in this column. So stay tuned!
Links
Parma parmapse.com, 440-237-8650
Yeah Racing distributed by rcmart.com, yeahracing.com
 RC Driver The Best In RC Car & Truck News, Reviews & Video


