 RC Driver The Best In RC Car & Truck News, Reviews & Video


Go All-Terrain With Your Trail Truck!
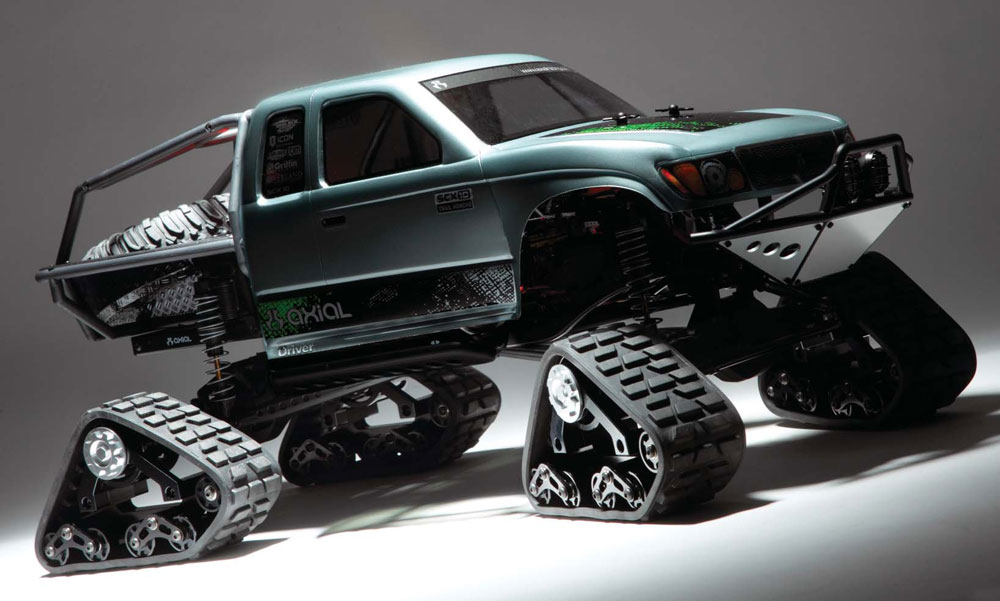
It is not often that a completely unique upgrade part comes across our desk that is a drastic departure from the original part it is designed to replace. When I saw the RC4WD Predator Tracks, I could hardly contain my excitement to try them out. Not only do they appear wicked cool, but they are also built tough in order to handle harsh off-road action. RC4WD makes fitting kits so the Tracks can be used on several different trucks. I love the scale looks of the Axial SCX10 Trail Honcho and knew it would make the perfect rig to try out the Predator Tracks.
ITEMS USED
Axial
• SXC10 Trail Honcho RTR truck—AX90022, $355.98
Castle Creations
• Mamba Max Pro speed control—010-0066-00, $127.98
• 1410 Series 3800Kv sensorless brushless motor—060-0021-00, $110.98
MaxAmps
• LiPo 5450 2-cell 7.4V battery pack—$112.49
RC4WD
• Special edition black Predator Tracks (pair)—Z-W0017, $119.99
• Predator Tracks front fitting kit for Axial AX-10 axles (Scorpion, SXC10)—Z-S0610, $34.99
• Predator Tracks rear fitting kit for Axial AX-10 axles (Scorpion, SXC10)—Z-S0613, $29.99
• Lexan guard for RC4WD Predator Tracks (enough for one pair of tracks)—Z-S0023, $8.99
W. S. Deans
• Ultra plug, male/female set—WSD1300, $3.25
1. The Gear

In order to transform the Axial SCX10 Trail Honcho into a killer all-terrain truck, you will need not only the two pair of RC4WD Predator Tracks, but also the front and rear fitting kits to install them onto the axles. RC4WD also makes fitting kits for the Axial Scorpion, Wraith, Ridgecrest, Tamiya High-Lift series of trucks, HPI Wheely King, Crawler King and the RC4WD Yota front axle kit.
RC4WD offers goldish-orange colored Predator Tracks and special edition black Tracks shown here. By the time you read this article, RC4WD will also release an EVO edition that comes anodized silver with a larger diameter wheel to help counteract the gear reduction of the Tracks.
2. Motor System Swap
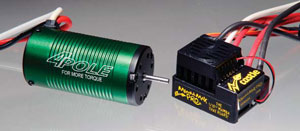
According to RC4WD, it is suggested to upgrade to a brushless motor system since the Predator Tracks gear down the truck. I decided to go with a brushless motor and speed control from the trusted crew at Castle Creations and in went the Mamba Max Pro speed control and 1420 Series 3800Kv brushless motor. All I needed to do to the Castle system was to solder a Deans male Ultra Plug to work with my deans equipped MaxAmps LiPo battery pack. The install onto the Honcho was straightforward with no issues.
3. Remove the Wheels, Steering Knuckles and Links
After the stock wheels are removed, unscrew the left and right steering knuckles from the uprights and the link from the steering servo arm.
4. Dissasemble Stock Steering System
The design of the Predator Tracks wisely makes use of many stock parts and from the steering system you will need the axles, ball bearings, bushings and screws. Leave the rest of the components attached if you decide to switch back to tires and wheels.
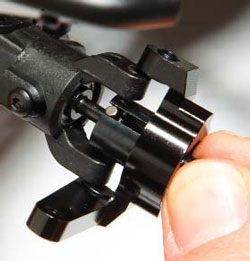
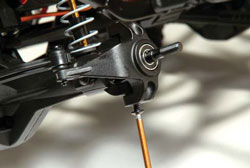
5. Install RC4WD Knuckles
The RC4WD knuckles are constructed of CNC-machined aluminum and are black anodized. Install the inner and outer bearings, the bushings in the top and bottom and then insert the axle into the new knuckle. Notice the steering arm is at the lower position and use the stock hardware to fasten it in place.
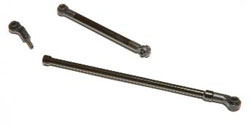
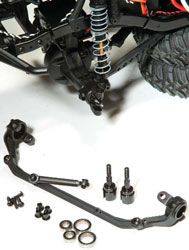
6. Assemble Drag and Steering Link
RC4WD includes an aluminum drag link and steering link, but no hardware or ball ends to complete the assembly. Luckily I had spare ball ends in my parts bin along with the necessary threaded setscrews to install them. The angled ball ends are from an original Axial AX10 Scorpion. The angled ends are needed so that the drag link can clear the center differential when either full right or left is called for.
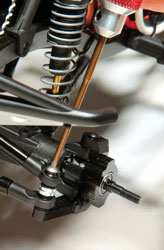
7. Attach Drag and Steering Link
To attach the drag link and steering link onto the truck, I had to dig into my stash of spare hardware. The right side is straightforward while the left side required an extra long screw to not only attach the drag link, but also the steering link. Notice that I added a spacers between the links to allow everything to line-up properly.
8. Mount the Predator Tracks on Front End
While using the stock axle pins, slide on the RC4WD hex hubs followed by the Predator Tracks. The Track is held in place with the stock locking wheel nut and then the outer aluminum bearing cover is screwed on. Now the front is finished.

9. Remove Stock Components from Rear Axle
Take off the rear wheels along with the aluminum hexes, axle pins and straight axle adapters.
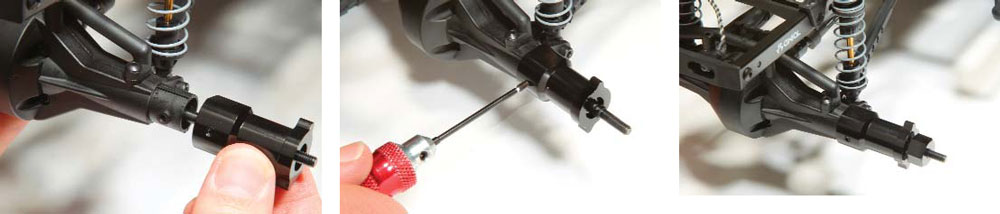
10. Install RC4WD Rear Straight Axle Adaptor
Slide the machined-aluminum rear straight axle adaptor onto the axle and line up the screw mounting holes.

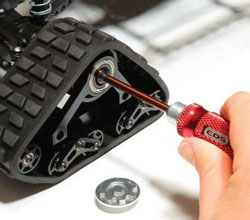
11. Mount the Predator Tracks on to the Rear Axle
Line-up the Predator Tracks and slide them onto the new aluminum hex hub. Use the stock locking wheel nuts to keep the Tracks attached to the Honcho. The last step is to screw-on the aluminum gear cover onto the track. Time to hit the outdoors!
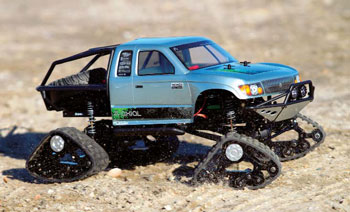
BEHIND THE WHEEL
Once the RC4WD Predator Tracks were installed, it actually made the great-looking Axial SCX10 Trail Honcho even better looking, giving it a meaner, more aggressive stance. I could not wait to try it out. I was surprised by how much heavier this upgrade made my rig. Each track weighs 11.5 ounces compared to a stock Honcho wheel and tire at 2.88 ounces for a total weight increase of an incredible 2.16 pounds. One benefit of this weight is that it is all very low to the ground and it helped keep my SCX10 planted, but I have to imagine that the extra heft will end up taxing the drivetrain and suspension—time will tell.
The design of each Track has the front edge slightly raised off the ground to help it climb over obstacles. The track can also pivot front to back as well as the small individual sets of wheels to help the tread hug the contour of the surface it is traveling across. There is also an adjustment where the track tension can be altered by adding or removing a spacer that sits between the main section of the track and the leading wheels. RC4WD also did not skimp with this product and has the tracks equipped with metal ball bearings for all of its wheels—perfect for reduced friction, but not so great when maintenance time comes.
Behind the wheel of my newly upgraded Trail Honcho is pretty awesome. The power provided by the Castle Creations brushless motor system and MaxAmps LiPo battery pack got the Predator Tracks spinning with some decent power and provided a good top speed. Before driving the truck with the tracks, I speculated that turning could cause the treads to come off the track. I was wrong. My truck had no problem making turns and even when at full throttle—the treads stayed where they are suppose to. I was also impressed that the truck could still make relatively tight turns to maneuver around obstacles. The climbing power and ability to get through surfaces that a wheeled vehicle would struggle, like loose sand and dirt or even snow, was not an issue for the RC4WD Predator Tracks. What would cause the Honcho trouble is extremely steep assents with loose ground or if the surface was wet like when on the rocks. If you plan on a lot of sand running, RC4WD offers optional Sand Blaster rubber tracks (item no. Z-T0080) that have a super-aggressive, tall lug design.
WRAP UP
The RC4WD Predator Tracks proved to work very well tackling off-road terrain and allowed my Axial Trail Honcho to traverse places it normally could not. The Predator Tracks are well built and stood up to testing. The downside is the overall cost for this upgrade and the amount of time it takes to tear down each Track for the inevitable maintenance, but that is the price you pay for a wicked-cool and great-performing product. I do like that you can easily change back to the stock wheel/tire setup because there are no permanent modifications made to the truck in order to install the Predator Tracks. Now that this how-to is complete, I see this truck being turned into a project truck—stay tuned.
LINKS
Axial axialracing.com, 949-642-9425
Castle Creations castlecreations.com, 913-390-6939
MaxAmps maxamps.com, 888-654-4450
RC4WD rc4wd.com
W. S. Deans wsdeans.com, 714-828-6494


