 RC Driver The Best In RC Car & Truck News, Reviews & Video


By David Harrington
This article was originally published in RC Driver’s October 2015 issue.
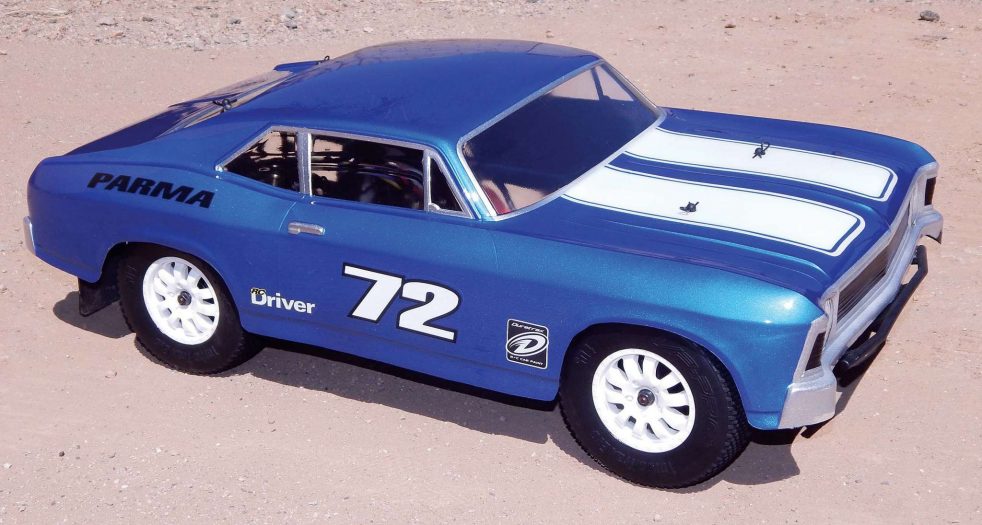
I have had a lot going on lately. The wife and I just purchased our first house together and meanwhile Parma is pumping out muscle car bodies for short course chassis faster than I can keep up. I’ve been trying to mix it up and throw other types of RC bodies in the mix, so I am just now getting to the 72 Muscle Baja, and they have already come out with two more, the 66 and 68 Muscle Baja. I saved the 72 for last because it was my favorite, but I don’t know, I may have a strong leaning towards the 68 now! My airbrush stuff is still packed up, and that’s where the convenience of spray paints comes in handy, which brings me to the point of this month’s article. I try to address all skill levels, but I do a majority of the articles with liquid mask and my airbrush because if you do this for any length of time that’s where you’ll eventually end up. With that said, just about everybody I know uses a rattle can and masking tape. When they have problems, I couldn’t even tell you what they did wrong. I would love to know. I sometimes forget you have to learn to walk before you can run. So this month we’re starting all the way over and doing a basic paint job with spray paint and masking tape. With the right stuff it is not too hard to get good results, it just takes some patience.
Parma
• 72 Muscle Baja Body #1246
• 10mm Fastape #40280
• 18mm Fastape #40257
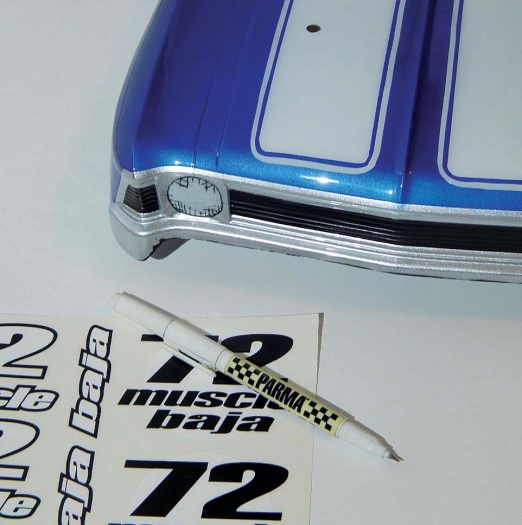
• Detail Pen #10400
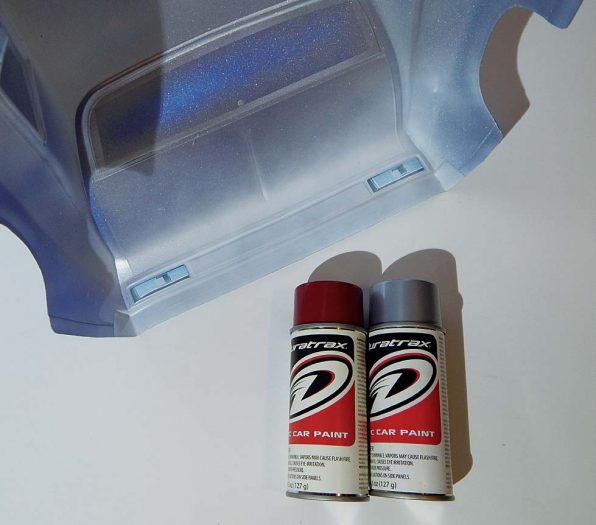
Duratrax
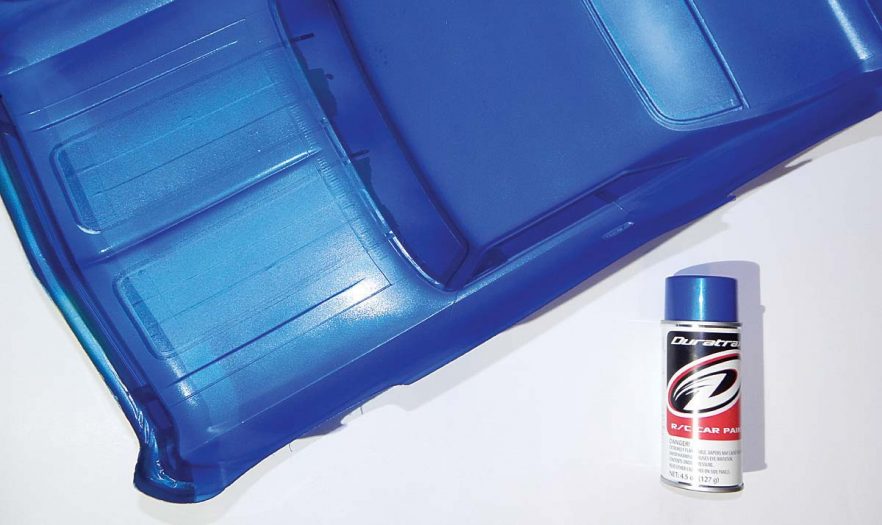
• Metallic Blue DTXR4265
• Silver Streak DTXR4262
• Basic Cover Coat DTXR4290
• Metallic Red DTXR4264
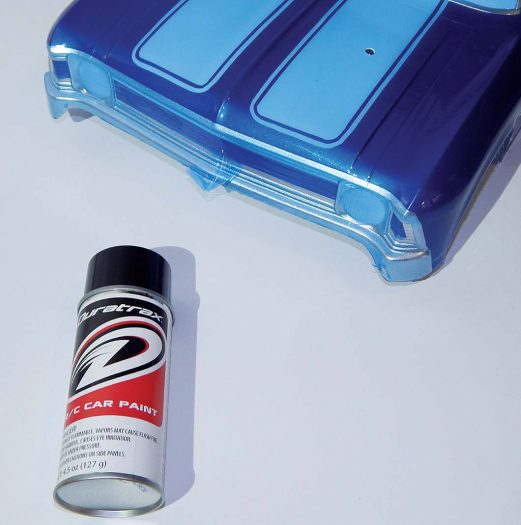
• Basic Black DTXR4250
• 1/8” Vinyl masking Tape DTXR5001
1 Since there are so many short course chassis on the market, and these bodies are designed to be a general fi t for all of them, you will have to test fi t the body on the chassis before you paint. First, I trimmed the body on the marked body lines with my curved Lexan scissors. I then sat it on my Serpent Spyder chassis to make sure the bumpers clear. I had to take an extra 1/8 inch off the front to clear the bumper. I then adjusted the height of the body mounts so that the wheels just tuck into the body. Keep in mind that it will drop down a little when you make the holes. I lined the wheels up in the wheel wells. The wheelbase on the body was ever so slightly longer than this chassis, so I split the difference front to back. I then looked through the top of the body to make sure the gap between the body and wheels is equal on both sides. I then marked my holes at the top of the body mounts and made my hole with a body reamer.
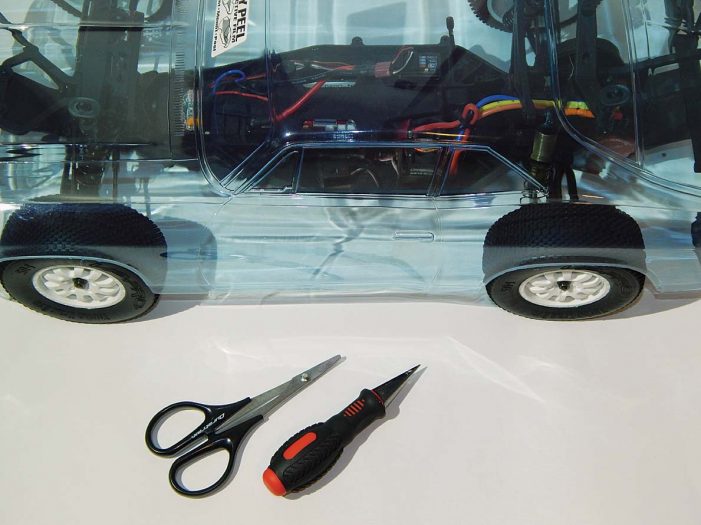
2 After test fi tting I scrub the body out with dish soap and warm water to remove any residual oils, and leftover trimmings. I start masking with the included precut mask. To apply these I like to put the body between my knees and look at it from the outside. Then with the mask on the inside, I line up a corner, usually the bot- tom. Then I line up the bottom edge, and press it down about a 1/4 inch along the edge, allowing the rest to hang. I might have to reposition the fi rst corner. When it is all lined up I start working my way across back and forth. Don’t worry about small bubbles; just make sure the edges are sealed by rubbing them down with the back of your fingernail. There are also headlight and taillight masks included on the sheet.
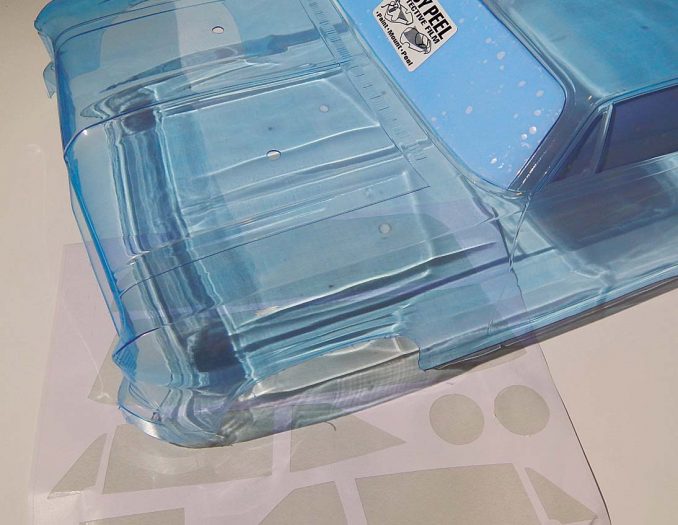
3 Now it is time to mask off all the trim. To do the windows, I used 10mm Fastape. I lined the tape with the edge of the trim lined molded into the body to start. Once it started I used the window mask as a guideline. The straighter parts of the windows are deceptively not straight, and you will have to bend and pull the tape along the line. I overlapped the corners, and cut the excess off with my hobby knife. I also did the edges of the grill trim, the rear tail lights, and rear trim piece the same way. The door handle I had to cover in tape and cut out.
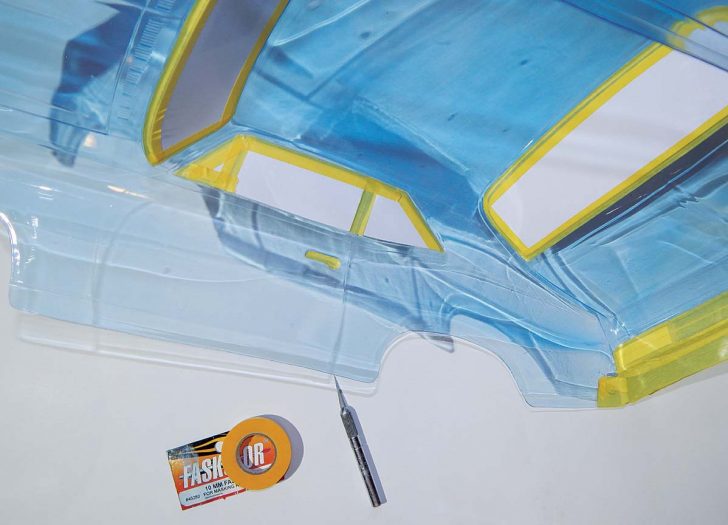
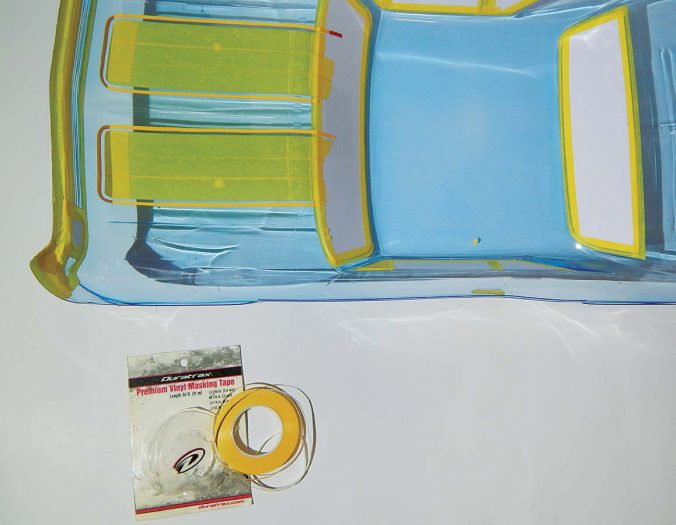
4 I wanted some kind of simple graphic, so I decided to just do rally stripes on the hood. I used 18mm Fastape, since I had it, but you could also use the 10mm here. I placed one piece about a half inch from the center of the hood line, and then another about a half inch from the outside hood line. Then I placed a third piece down the center to fill it in. I just tore the ends, and then to even those out I placed a piece of tape across the end, about 1/2 inch from the grill, and used that piece as a guideline to cut the end with my knife. To do the outline I used Duratrax 1/8 inch vinyl masking tape. This stuff is very thin and flexible. It takes some effort to guide it in a straight line, but it is flexible enough you can pull it around the tight corners.
5 Once everything is masked off, it is time to start laying paint, but fi rst I like to give it a quick wipe with a paper towel moistened with window cleaner to remove any fingerprints I may have got on it when I was applying the mask. I start with the Metallic Blue. It is best to spray outdoors, to avoid vapors, at the temperatures recommended on the can (60-85 degrees). Hold the can 8 to 10 inches away from the body; do not hold it too close. Lay the coats in light mist coats. You want to lay at least three light coats. Spray in straight, overlapping strokes, spraying past the body, because the paint will lay thicker at stopping points. Let off the button after each stroke so you do not depressurize the can. The metallic color is semitransparent, so you should not lay it so thick as to make it opaque.
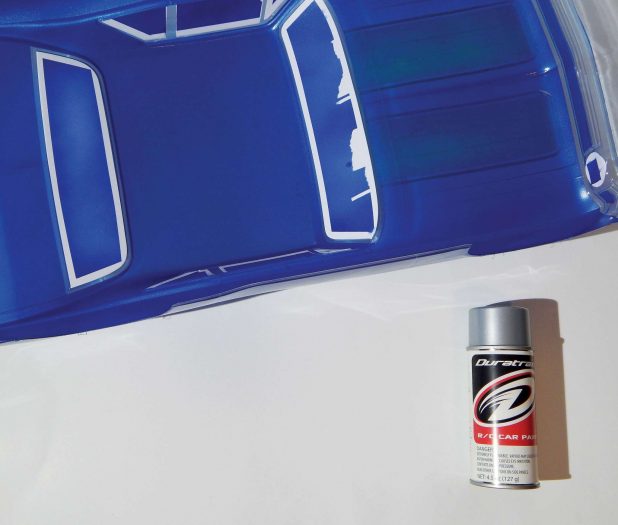
6 When you mask everything off with tape beforehand, it is a lot easier between coats of paint; it’s all downhill from here. Just remove the mask from all the trim pieces and door handles. You can use the tip of your hobby knife to get the tape started. The blue will need to be backed with Silver Streak to make it more opaque and give it some sparkle, so I spray the whole body, fi lling in the trim at the same time.
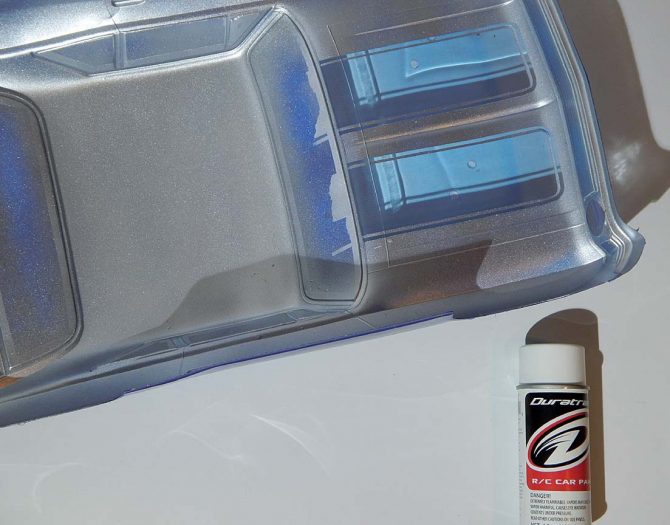
7 Now I remove the mask from the stripes on the hood. I also cut out the little squares in the middle of the taillights and remove the headlight mask. As opposed to using a standard white I use what Duratrax calls a Base Cover Coat. It is a special formulation designed to be very opaque. I fi ll in the stripes and the little squares in the rear. Then I cover the bumpers to block the darker colors from coming through, allowing some to incidentally spray across the bottom of the headlights.
8 Next I remove the taillight mask, and fill the taillights with Metallic Red. You might think that’s an expensive can of paint for such a small job, but you can save it for your next body. It’s always good to have an extra can of paint around. The red will also need to be backed with the Silver Streak. I also fi ll the remainder of the headlights with the silver.
9 This is something you’ll see me do almost every month. I cut the overspray fi lm away from the grill and fi ll the area with Basic Black. I just think it really adds some realism when you paint from the outside to get a fl atter fi nish where needed. I also back the whole inside with the black, because I feel it gives it a clean look, especially when you look through the windows.
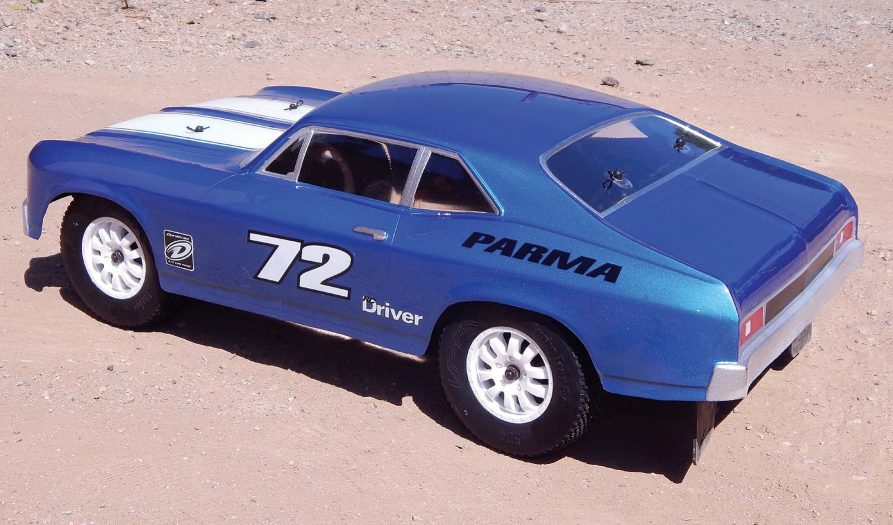
10 All that is left to do is to remove the window mask, overspray fi lm, and add some details. I like to outline and fi ll in some of the lines around the edge of the headlights with my Parma detail pen. Any fi ne tip permanent marker will work, but be aware some brands appear purplish in the sunlight. Add some of the included number and sponsor stickers and it is starting to look like a race car.
WRAP UP
It’s been a while since I just taped off a basic paint job, but there are certain merits to using tape and I was just a little surprised by how clean it came out looking. Take the time to do it right and with the proper materials, such as the ones offered by FasKolor and Duratrax, and you should have a nice looking body when you’re done. Stay tuned for more from the Muscle Baja series in the coming months!
Links
Parmaparmapse.com, (440) 237-8650
Duratraxduratrax.com, (800) 682-8948


