 RC Driver The Best In RC Car & Truck News, Reviews & Video


Get an A+ in Geometry 101
So let’s say you’ve just entered the RC car world and you’re ready to start tuning the suspension on your ride, but you haven’t the first clue on where to start. You’re a backyard warrior, skate park smasher or track loyalist, and there are enough tuning options on even the simplest of vehicles to make your head spin. There’s no need for a degree in math and you don’t have to have Pythagoras as a pit partner. With a few simple tools, a smidgen of knowledge and a notebook for recording setup info, you’re good to go.
First things first; what exactly are we dealing with here? As I mentioned before, there are virtually limitless setups attainable through a vast number of suspension tuning options. However, for the purposes of this article we will focus on the following five aspects of your vehicle’s final setup for any given purpose: Camber, Caster, Toe In/Out, Ride Height and Shock Angle. The single most important thing to remember about different setups for different cars is that drivers all have different styles and setup specifics. What works for me on this track or that may not work for you and vice versa. The second most important thing to remember is that when making changes to a vehicle’s setup, make only one change at a time, test the vehicle and then make further changes…one at a time!
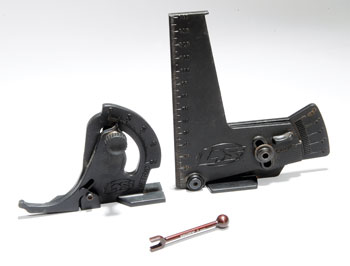
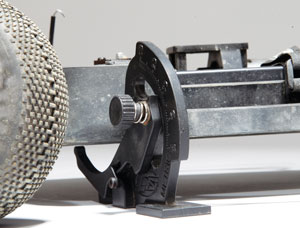
The tool shown here is a camber gauge. Camber gauges sit on a flat surface and up against your wheel and by moving it you can determine how many degress of camber the suspension is set to. Using the numbers on the gauge, you can set the tool and then match your wheel to that angle to get the camber setting you wish.
Camber: This is the angle at which the tire and wheel ride in relation to the ground when viewed straight on from the front or rear. Zero camber is a true 90 degrees from the ground. If the top of the tires are leaned in towards the vehicle, this is considered negative camber. Conversely, the top of the tires leaning away from the vehicle is considered positive camber. Traditionally, off-road vehicles are set with two degrees of negative camber, which in theory should increase steering. The general idea is to keep the tread of the tire, instead of the sidewall of the tire, on the road throughout as much of the run as possible. Three or four degrees of negative camber is pretty much the recommended limit, but some more progressive 4WD SCT setups offer more aggressive settings.
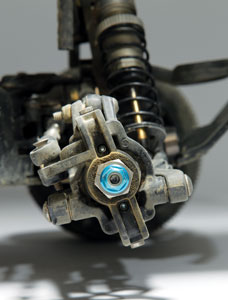
Caster: This is the angle at which the kingpin lies in relation to the ground when viewed straight from the side of the vehicle. A perfect 90 degrees from the floor is zero degrees of caster. Most off-road vehicles come stock with between 20 and 30 degrees of caster in the front as a result of the bumps and jumps that the vehicle will be subjected to. Generally speaking, more caster in the front will offer greater straight line stability at speed as well as high speed cornering, but will sacrifice initial turn in.
Caster in the rear is referred to as anti-squat and it is exactly what it sounds like. The steeper the angle of the hinge pins on the inner of the rear arms from back to front, the less the vehicle will squat upon initial acceleration. Bear in mind that under-damped rear shocks coupled with an over-tightened slipper will adversely affect the anti-squat settings. Adding too much anti-squat is also not suggested as it will offer little stability over rough stuff and will give the rear end a bit of trampoline syndrome.
Caster is often changed by changing the caster blocks or inserts in the block. It’s always good to have a variety of caster block on hand in case you need to tune your car at the track.
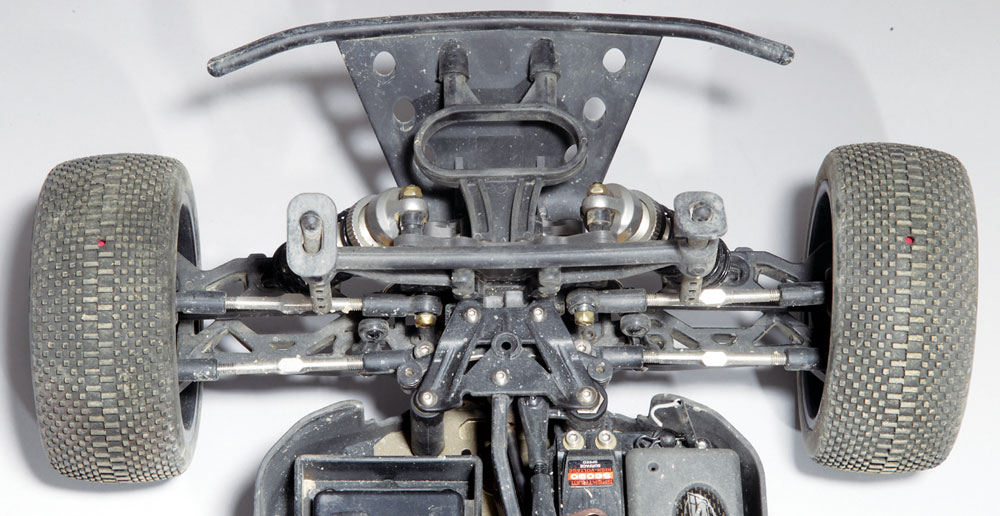
Toe-In/Out: This refers to the angle of the wheels/tires when viewed from straight above in relation to the center line of the chassis. Toe-in will offer greater straight line stability while toe-out will offer greater initial turn-in and sacrifice straight line stability. Again, this is something that can be altered by the shock mounting positions and the bump steer as well as the shock fluid and spring selection. Industry standards basically have most vehicles set at two to four degrees of toe-in on the rear of the vehicle for straight line speed while offering a bit of toe-out on the front to compensate for what is usually an under-powered servo in an RTR.
Ride Height: This is the distance from the ground to the bottom of the chassis on your vehicle while it is at rest. The two most popular or readily accepted ways for setting a vehicle for a ride height measurement are A) Drop a fully loaded vehicle from approximately one foot or B) Have the vehicle sit on the ground and compress the front and rear suspension independently and release. Whatever your method, the distance between the ground and the belly of your chassis after either method is your ride height. A good rule of thumb for ride height is the rougher the track and looser the traction, the more you’ll want. Smoother, higher-bite tracks will require less ride height. Think about it, high grip plus high CG equals traction roll and that’s not good for anyone except the local photographer and parts salesman.
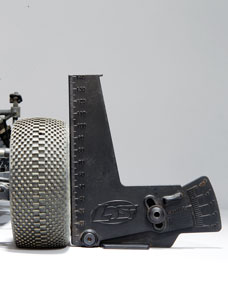
A ride height tool such as this one is slipped under the car to measure ride height. Using the shock preload collars you can adjust ride to a desired height.
Shock Angle: Shock angle refers to the mounting position of the shocks on both the upper and lower mounts. Not only are your spring and oil choices important factors in how your vehicle will handle, but they also govern the position in which the top and bottom of your shocks are mounted. Let’s break down the front first. Up top, the outermost mounting position will offer the sharpest steering response and the sharpest or quickest shock response, while the innermost mounting holes will offer less steering while offering smoother shock response. The bottom mounts on the front are pretty much all about cornering. Inner mounts will accentuate the vehicle’s low speed steering while outer holes on the bottom in the front will contribute to high speed cornering ability.
The rear shock’s mounting positions are also about steering response, but also about handling and launch characteristics. On the top of the shocks, an outer hole will lend itself to more steering and better suspension reaction, while the inner-most mounts will offer better rear traction and an overall smoother ride over rougher terrain. The lower mounting holes on the rear offer even further options for steering response. Inner mounts provide less steering with smooth shock reaction while outer holes equal sharper steering with less control over rough conditions.
Wrap Up
So that’s it. Pretty simple, eh? I know, your head is probably spinning and you have no idea what you just read, but take it slow, follow a few simple rules and you’ll be an expert tweaker in no time. Remember to change only one thing at a time and then practice, practice, practice. Make another change and then some more practice, practice, practice. The idea is to take it slow and only make one setup change at a time. If you change five things at once and the vehicle is all goofed up, who knows which change did what?
The one thing that every driver must accept, no matter what their ride or the terrain it may face is that there is no perfect setup for that vehicle under any circumstances. It is all about compromise and whatever works best for you. Every ride is different and every driver is different. The old adage holds true; different strokes for different folks. The most important words of advice I can impart to any rookie racer or basher where setup is concerned is to take it slow and practice. Once you’ve finished practicing and think you’re doing pretty well, practice some more. Tune yourself to the vehicle as much as you might tune the vehicle to yourself. Besides, driving is more fun than tweaking!
Losi Camber Gauge: http://amzn.to/2oAiVCc
Losi Ride Height Gauge: http://amzn.to/2mR4s8B
RPM Toe Gauge: http://amzn.to/2nBMvd5
Author: Matt Maziarz
Photos: Staff


